
*** July 2024 – Pumping and Control completely revised. ***
Update – Link to New Lawn automatic watering Scene
Introduction
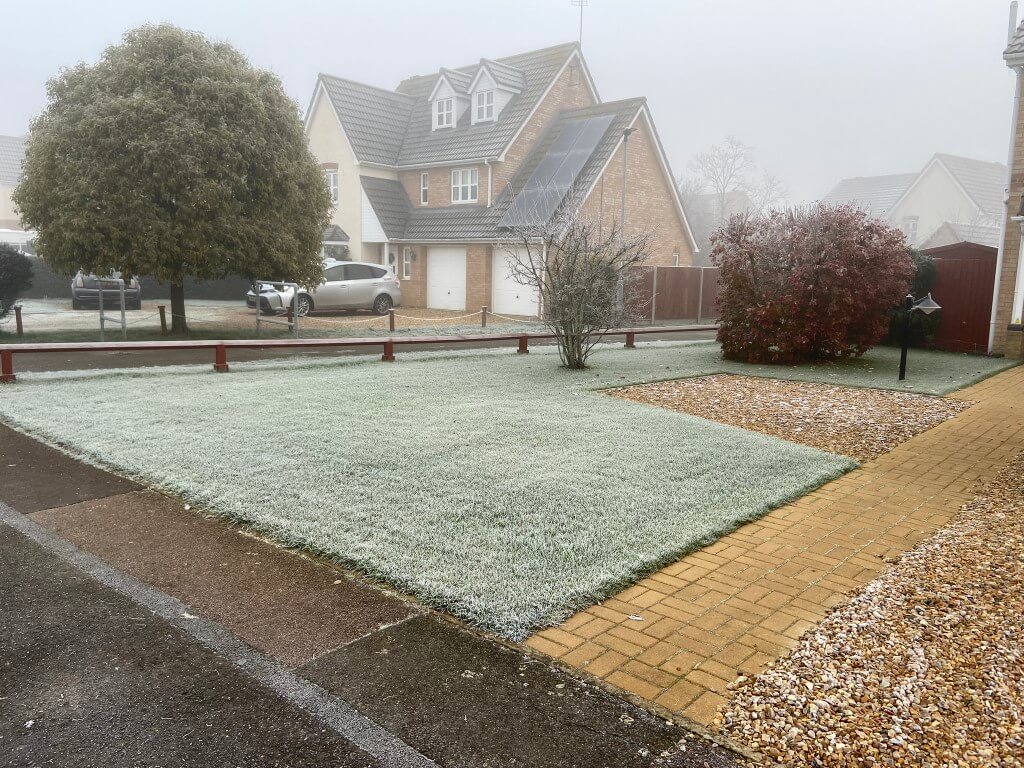
In 2022 I decided to invest some time and effort in getting the lawn in shape after years of neglect, so I followed a number of lawncare YouTubers, and with their advice, the lawn has never looked better even in winter.
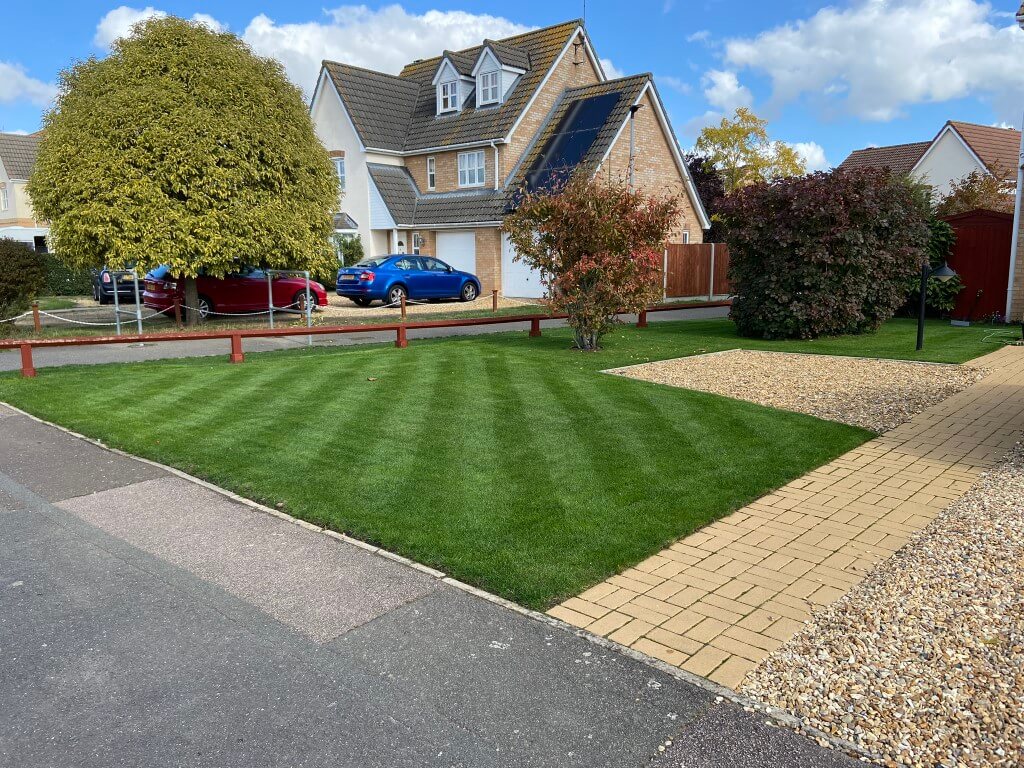
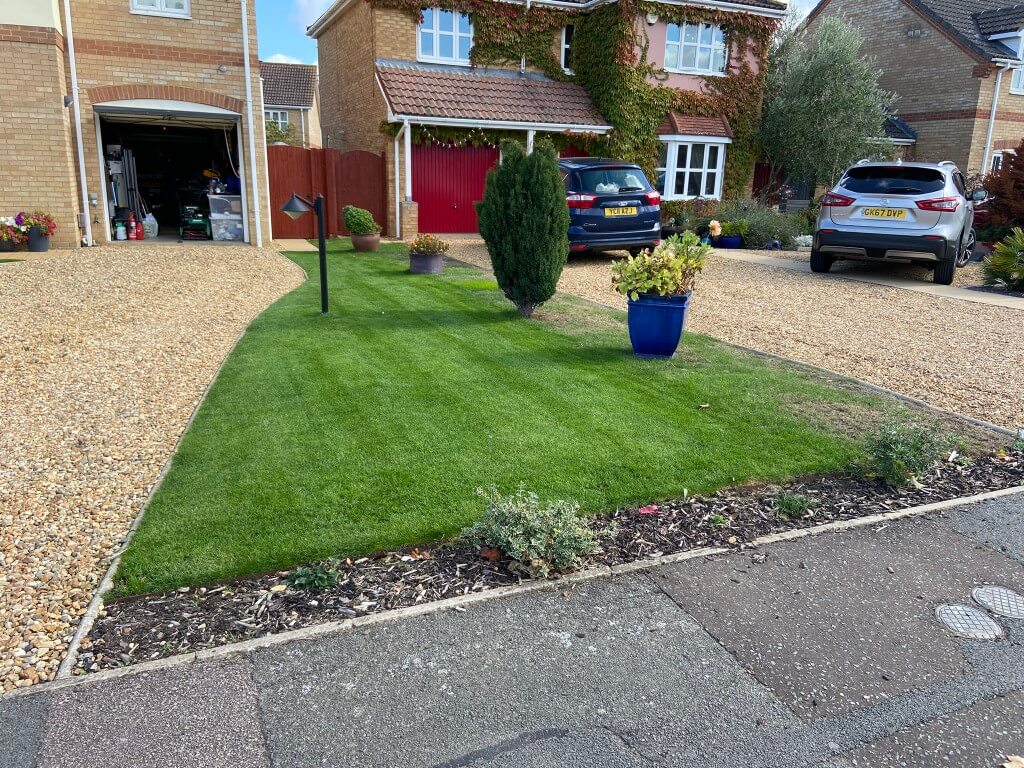
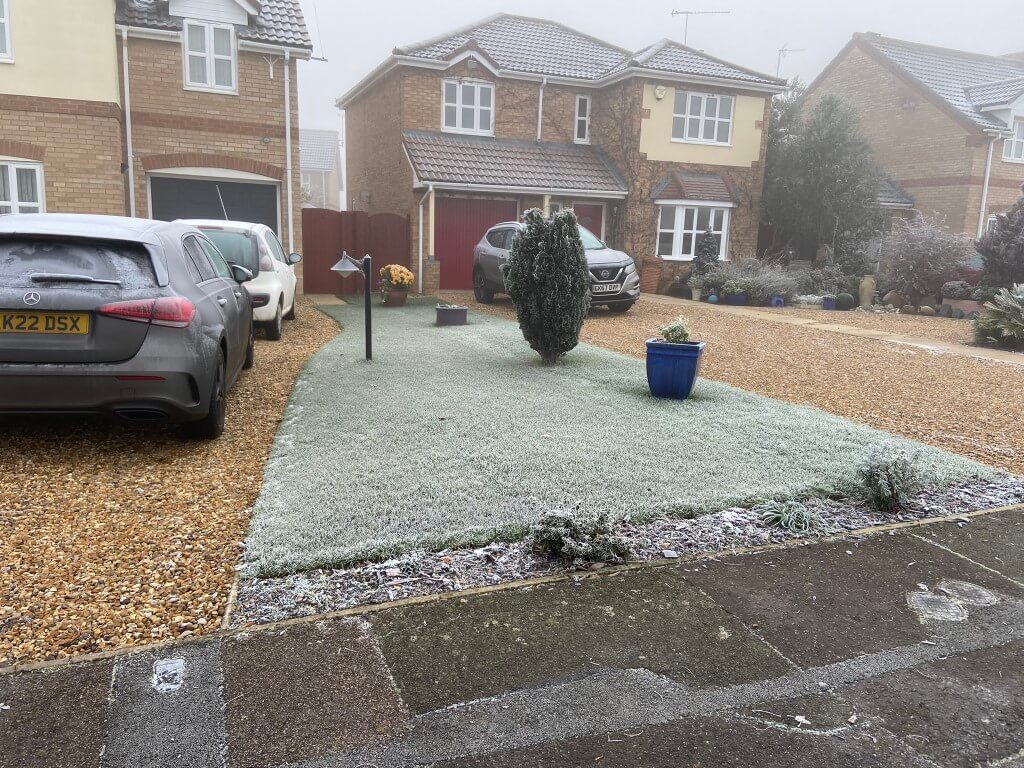
Unfortunately July 2022 was the hottest (currently) temperature ever recorded in the UK, and lawn watering was needed to keep the lawns (total area 117m2) in good shape, this took ages to do as my mains water pressure is poor and I have three separate sections of lawn, so the idea of an irrigation system tailored to my lawn layout was formed, I did have some experience, as I installed a simple Gardina pop-up sprinkler system at my last house in 1997, the difference being that the pipes were laid before the topsoil for the lawn.
I jumped back onto YouTube to start learning about irrigation system technicalities, and this blog is about how I installed my system.
Safety before you dig
As the irrigation pipes in my system needed to be buried rather than an above ground system and I’m digging near the pavement , I checked with Line Search before starting any works. This is a free online service, using this portal enables multiple interested parties to let you know if they have a pipe or cable near where you are working.
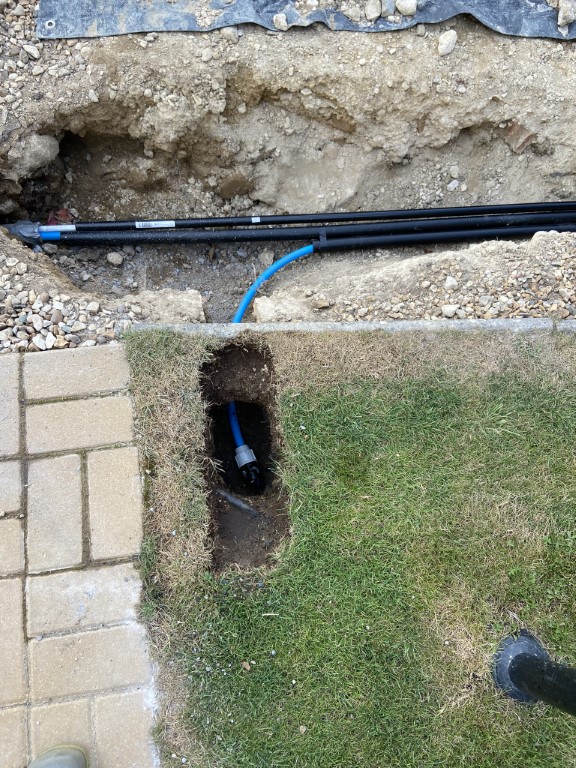
Not all companies are signed up to Line Search and during my hand digging I did exposed an Openreach telephone duct just inside my boundary which I did not expect!
Line Search did identify close proximity to Gas and Electricity services:
Anglian Water and Virgin Media services are also on my property but not identified by Line Search, I did make sure I knew the path these took before digging.
Irrigation Design
Fortunately a lot of information is readily available on the internet from manufactures, the two key players seem to be RainBird and Hunter, I downloaded the Hunter guide, so it made sense for me to deign around the guide and use their products.
Following the guide, I needed to find out was the static water pressure and water flow rate available to me, using a Toolstation pressure gauge connected to the outside tap which is fed directly of the incoming rising water main, here I recorded a spot reading of 2.7bar (40psi).
Chatteris is at the end of the water supply pipeline and the pressure can get quite low at times depending on upstream demand.
Flow rate was also measured at the outside tap, the flow rate was calculated at approximately 35 litres per minute, (timed bucket method, (I did confirm this later using a weir cup).
A quick glance at the Hunter products indicate that the optimal water pressure is 2.8 bar at the sprinkler head, therefore, I knew I would have to use a break-tank and pump to give me assured operation without dependency on the incoming water pressure.
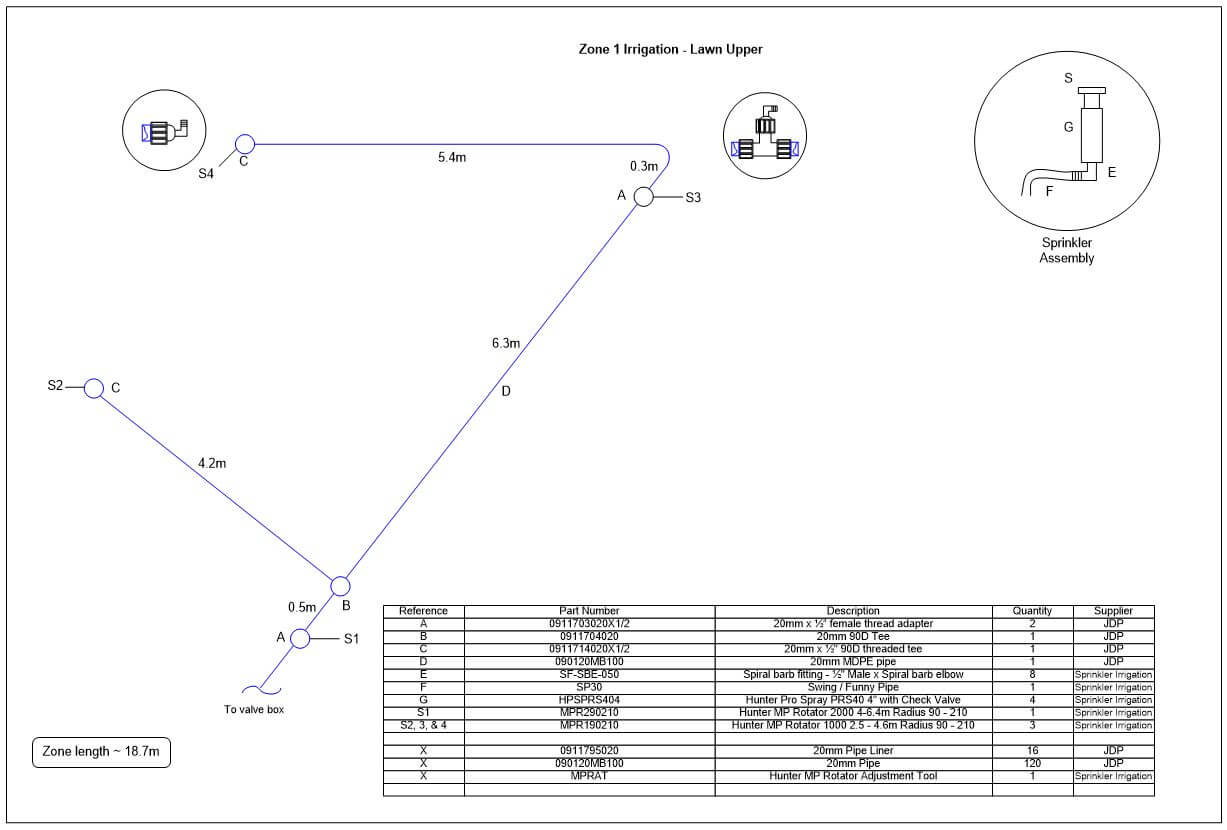
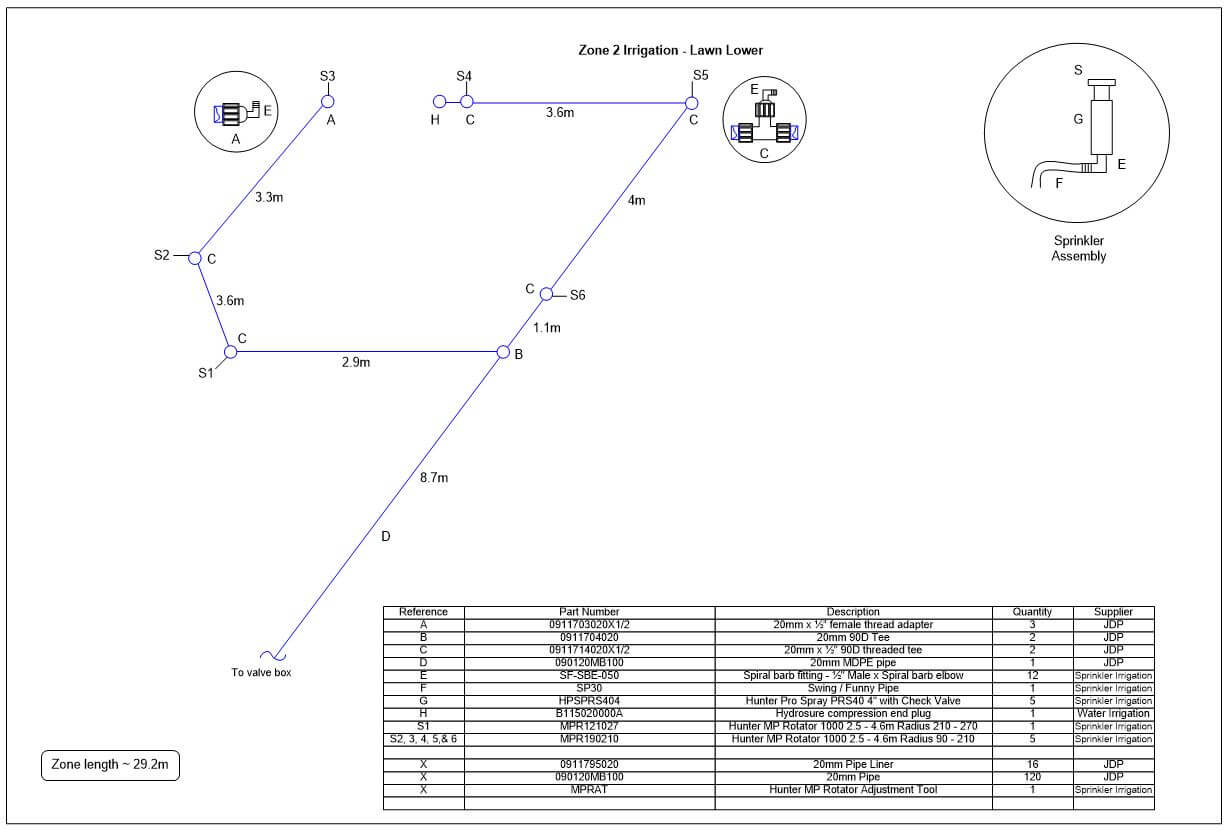
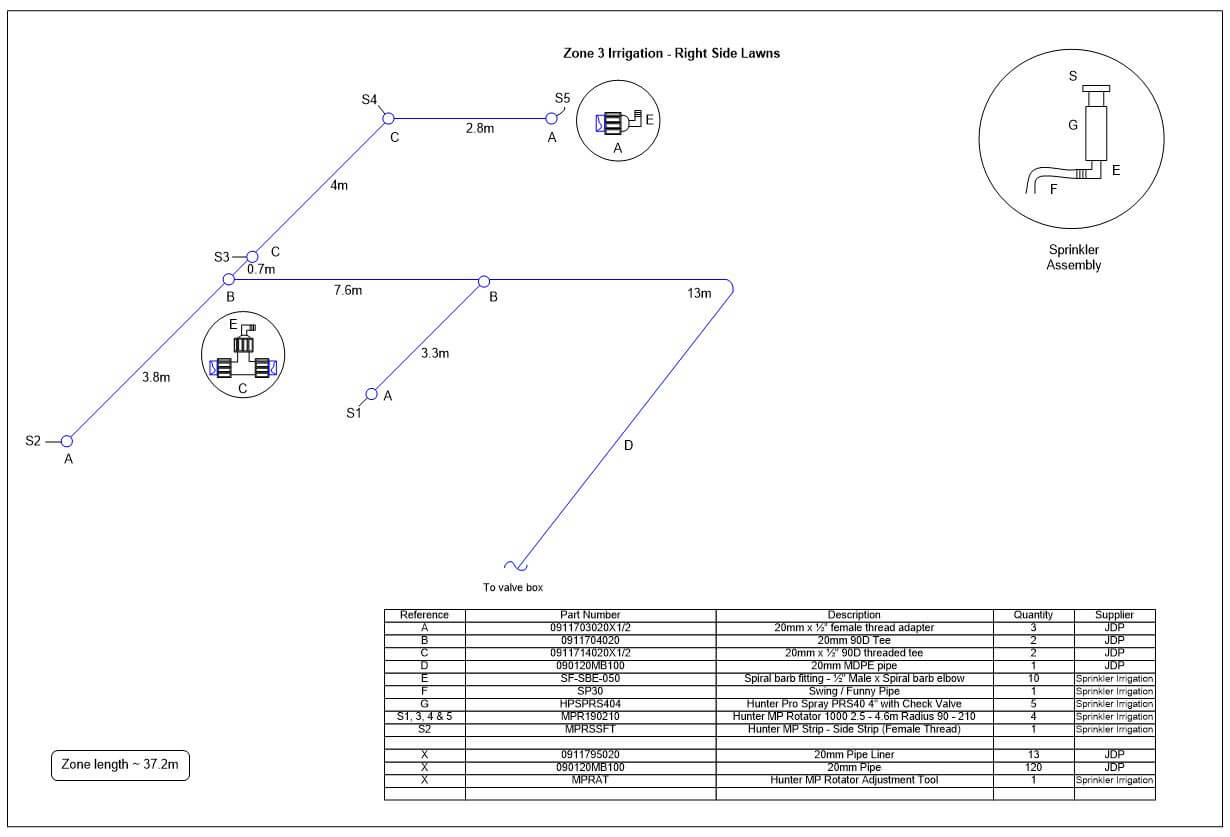
Using Visio, I drew out a scaled drawing of the house and garden in order to work out the spray head coverage, pipe runs including pipe lengths and types of fittings needed.
It is important to work out pipe friction losses so that the pipes used are not undersized which would give an unacceptable pressure drop at the furthest sprinkler head, another consideration is water storage, you can’t connect a booster pump to an outside tap, if you have a stream, that’s perfect.
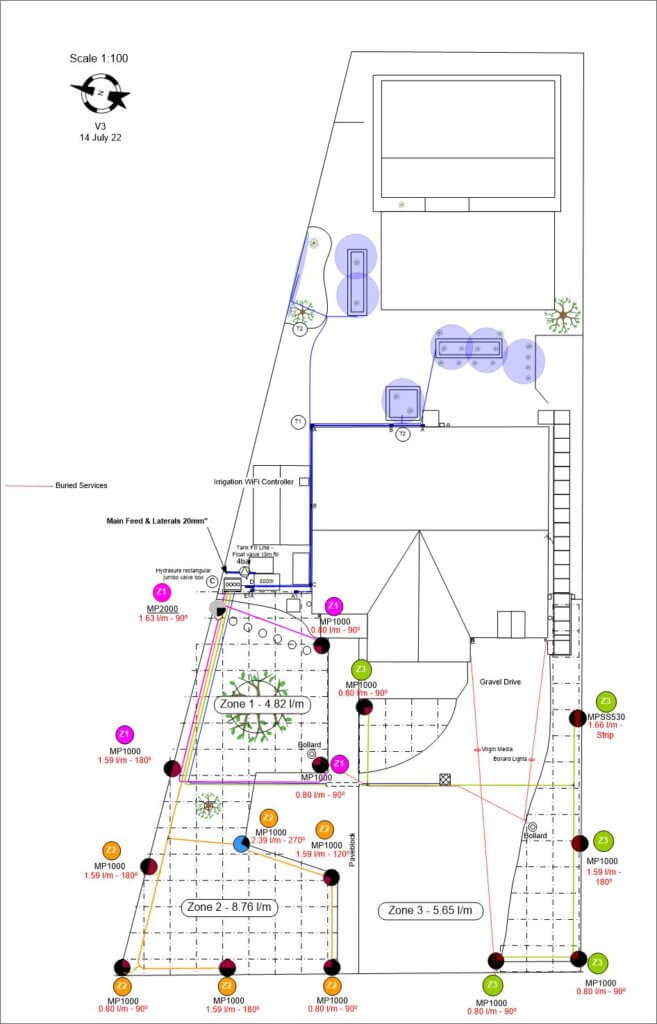
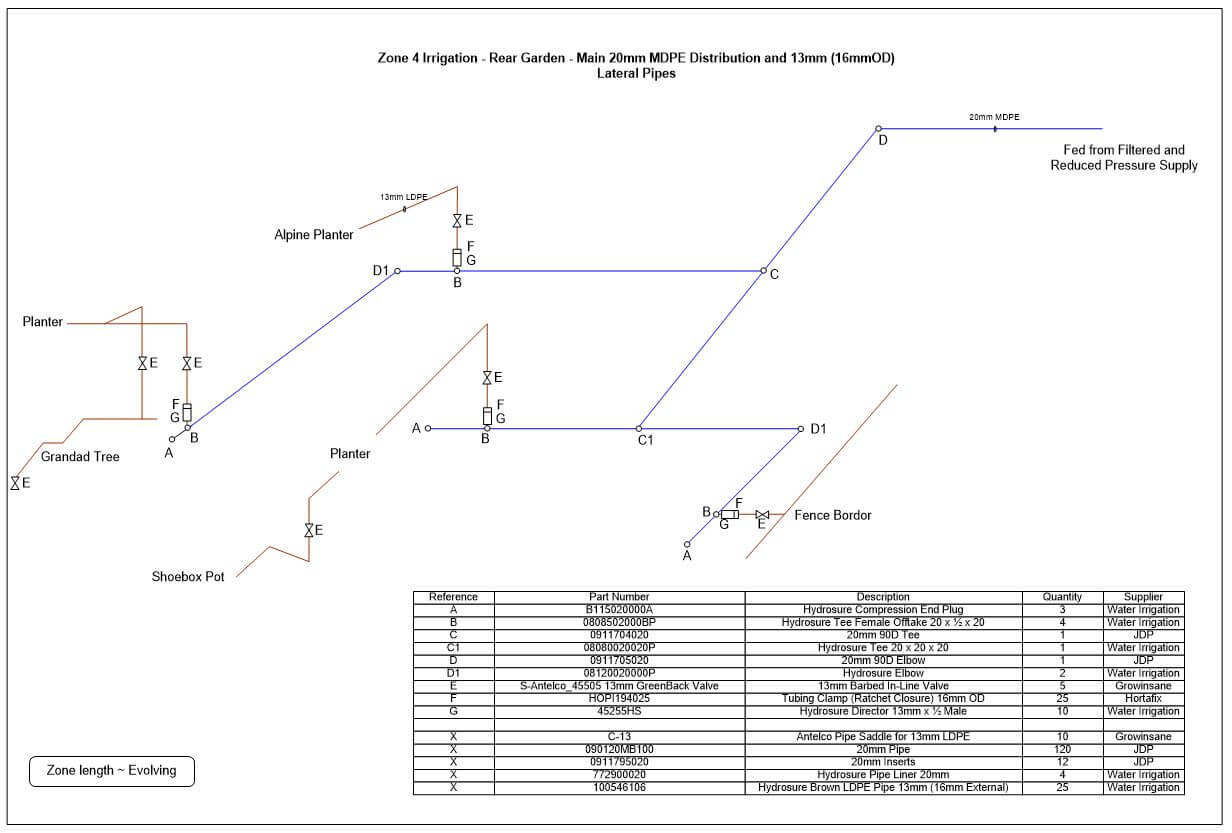
Digging Plan showing pipe routes, head placement and predicted water consumption, a full parts list can be extracted from this.
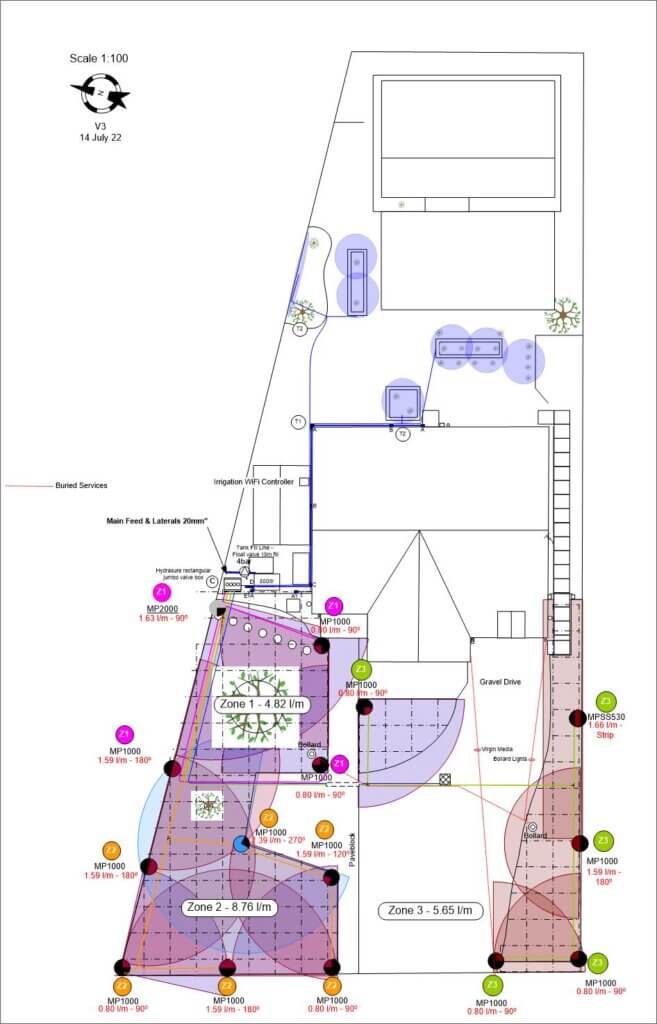
Additional Hunter Design Information:
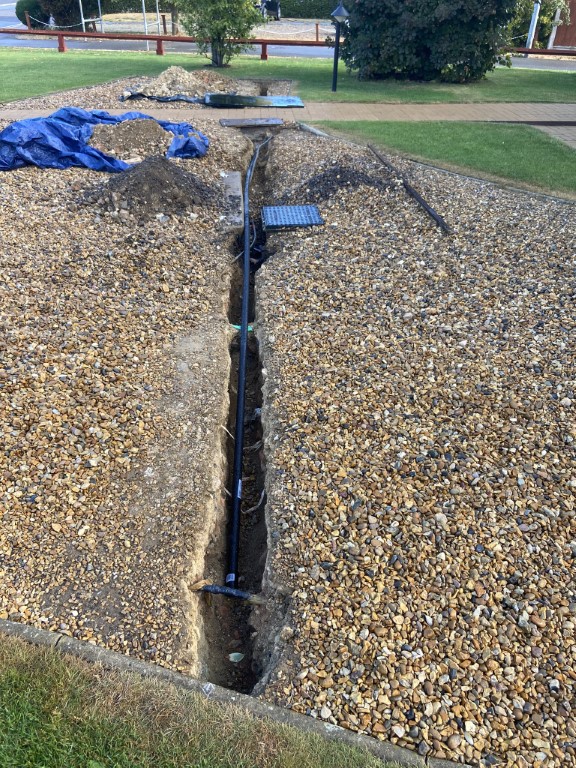
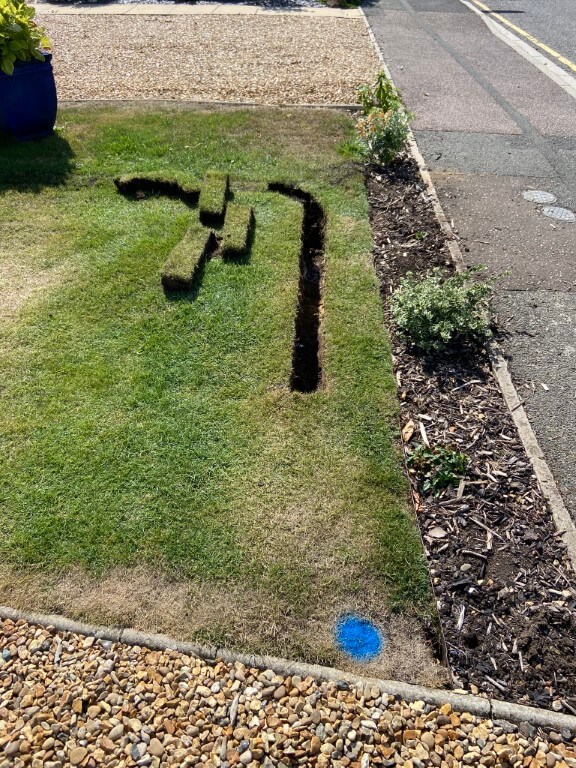
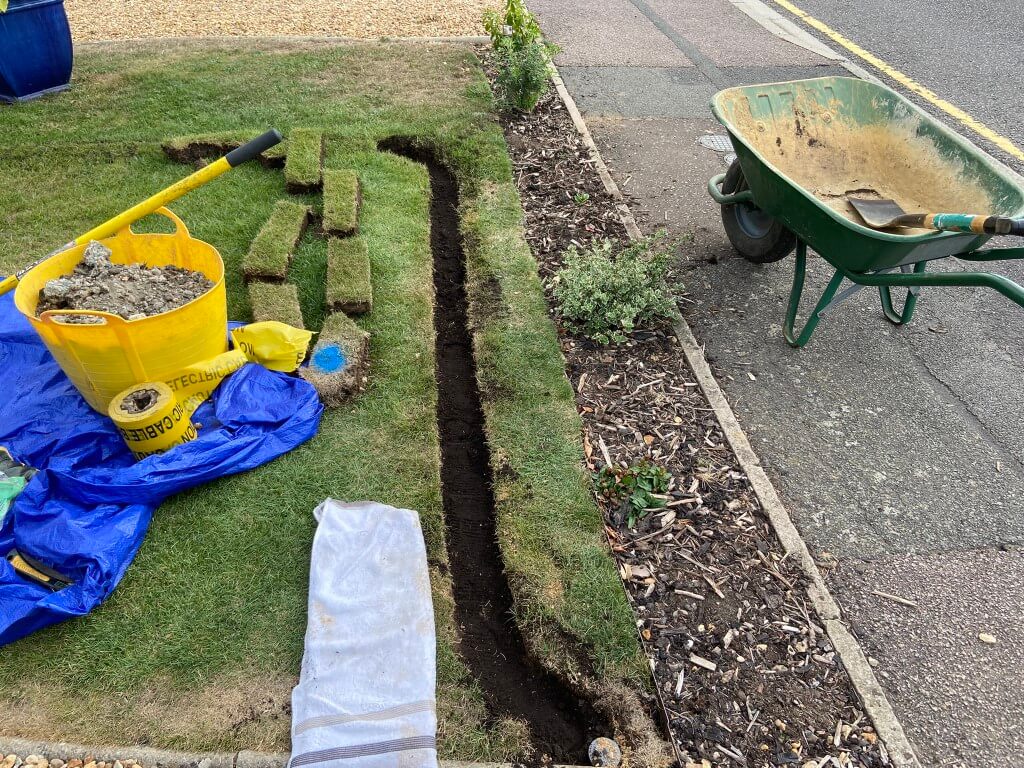
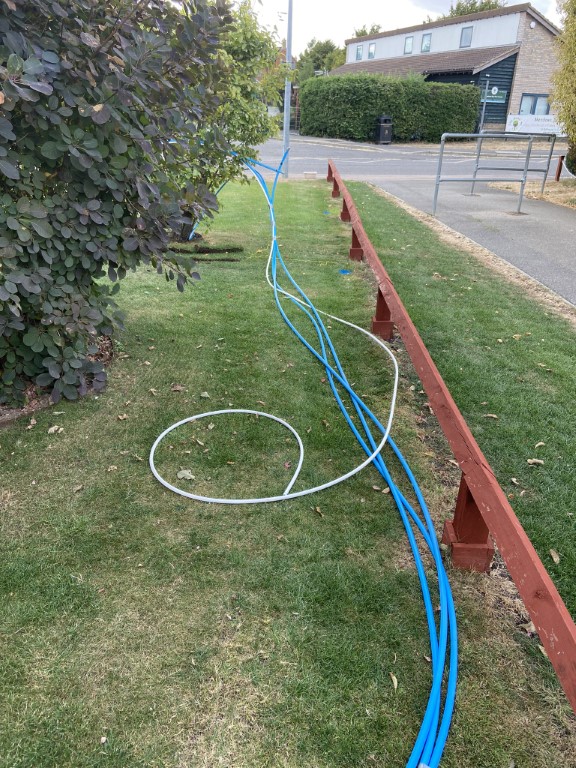
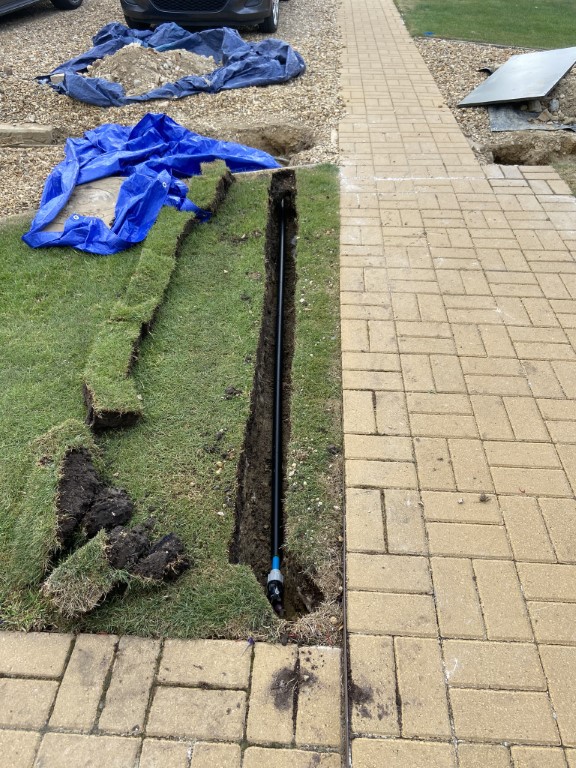
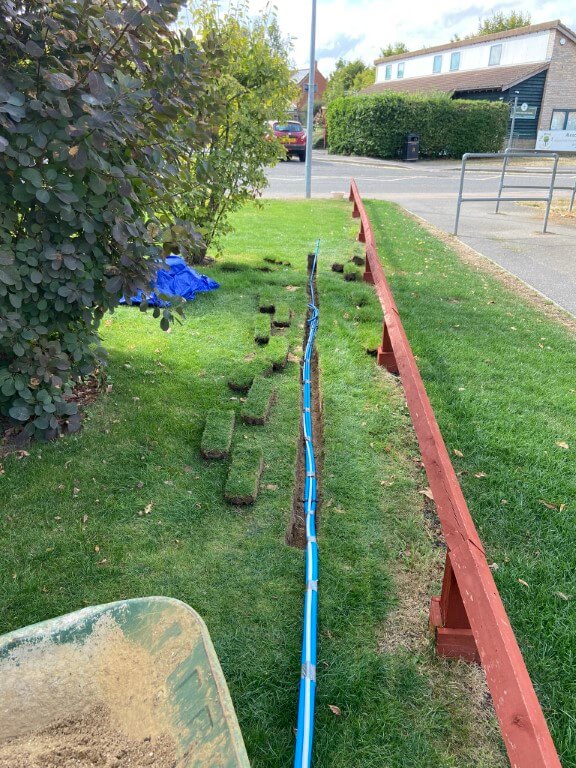
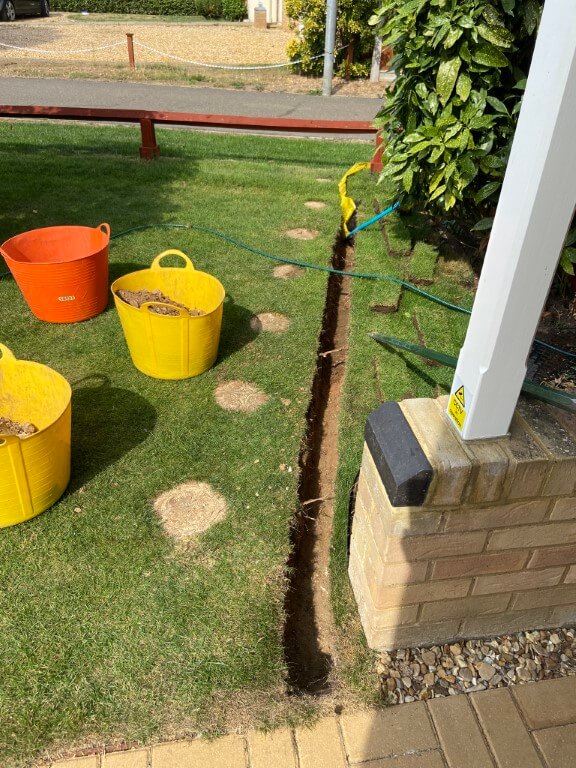
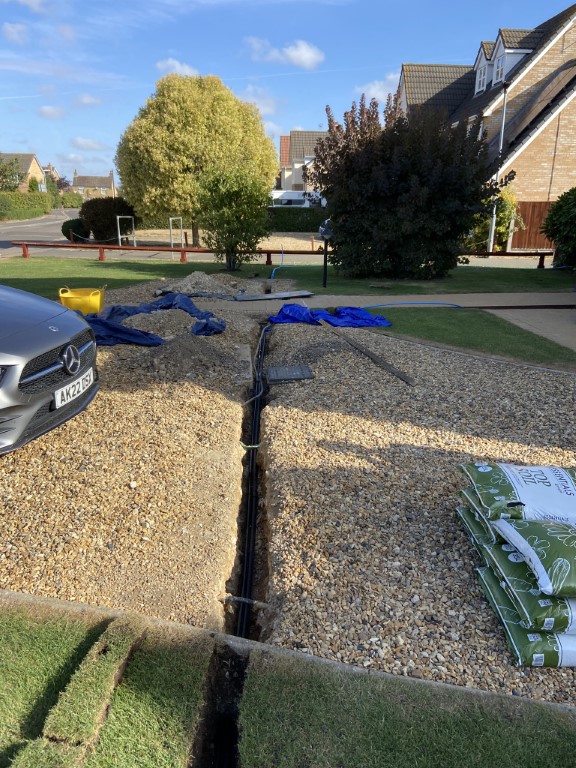
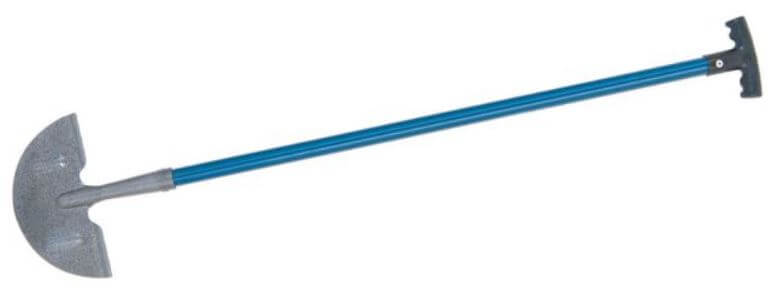
Digging Method: I first marked the sprinkler head locations on the lawn with a blue spray in positions from the dimensioned drawing, using string as a straight line to follow, the Lawn Edging Knife was used to cut a section of lawn approximately 12cm wide by 14cm long (4.3/4″x 14″), using the trenching shovel to get under the cut grass and levering it out for replacement later.
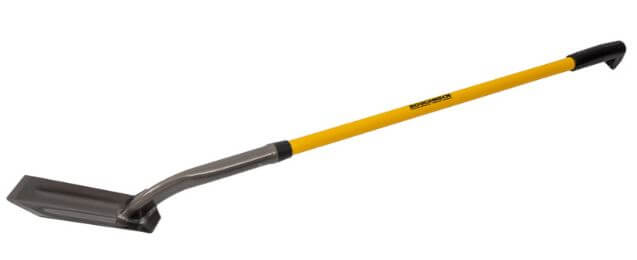
The width of the trenching shovel is 10cm (4″) about the same as the width of my boot which is handy for compacting the sand and soil later.
The depth of the trenching shovel is 20cm (8″) which in my case is adequate as water will be removed from the pipework over winter and also my aerators hollow tines are 12.5cm (5″) in length so I should avoid damaging the pipes when I aerate.
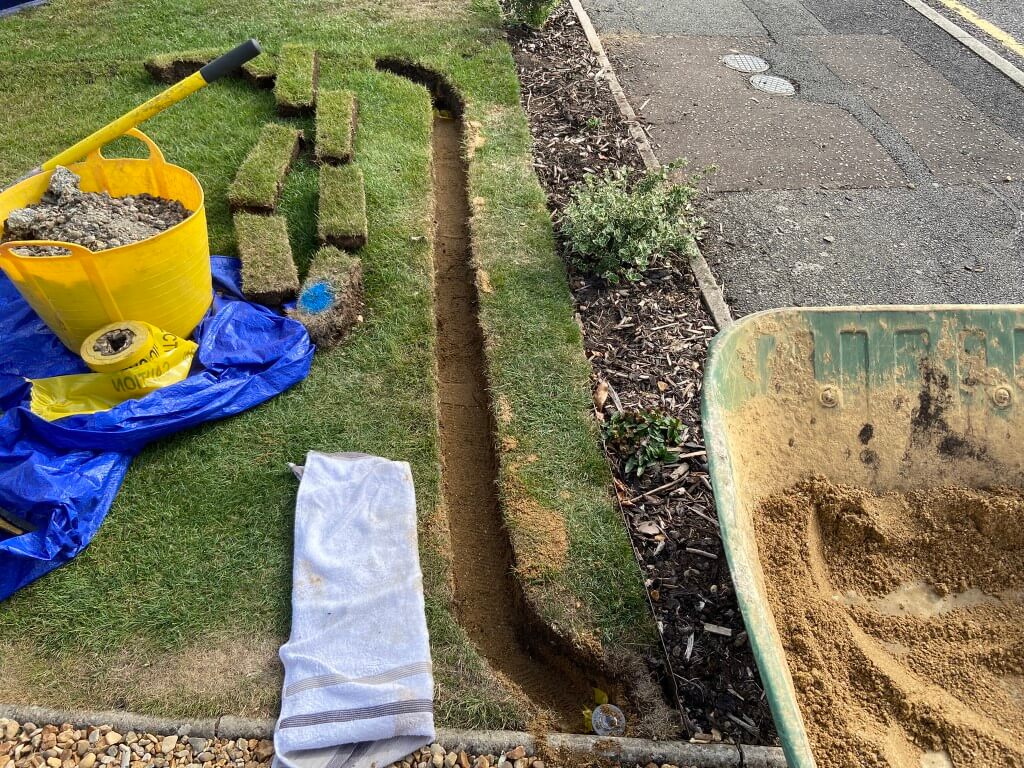
The builders left all sorts of bricks and debris everywhere before they put a layer of soil on top for the lawn, this made digging very difficult in places and the crowbar was superb in making a hard job easier.
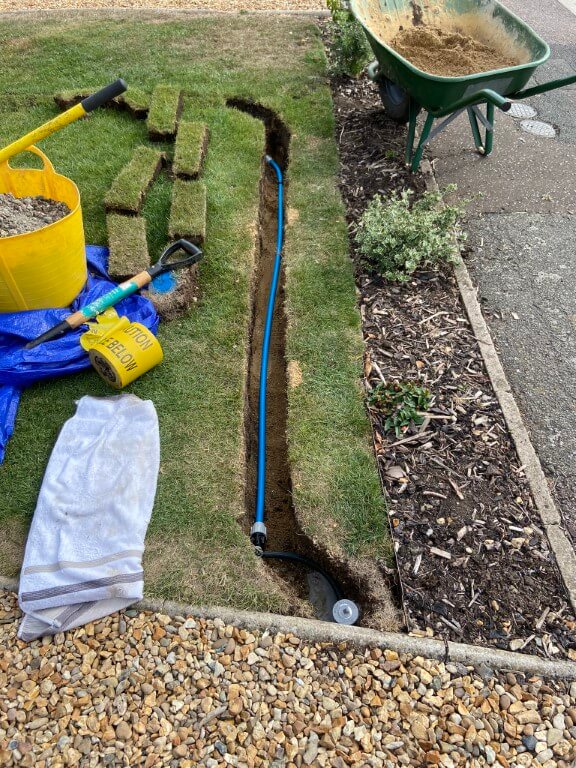
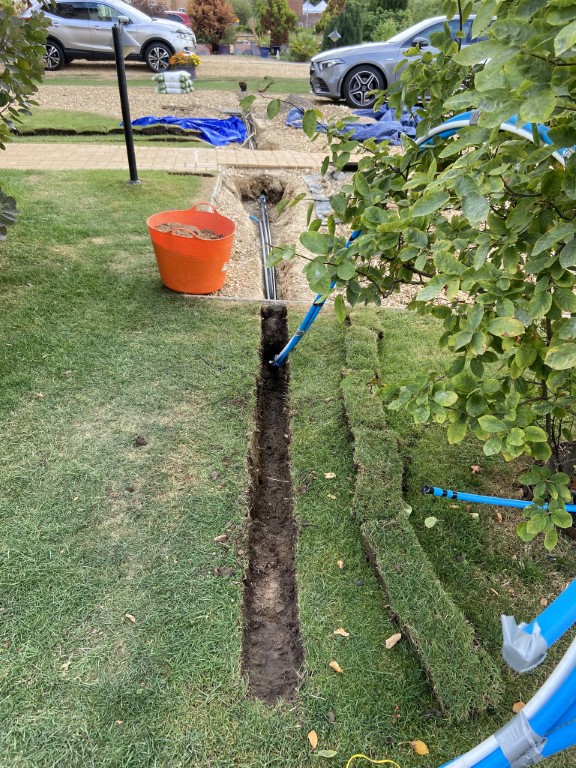
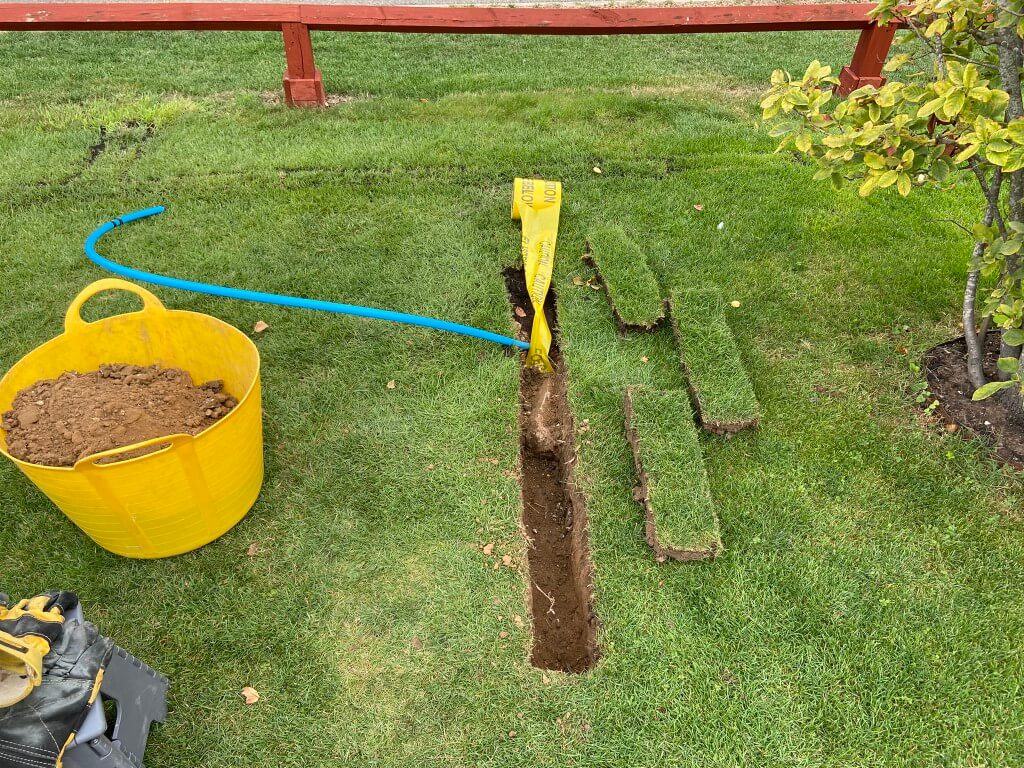
Once the trench was cleared of stones and the trench bed flat, a layer of sharp sand was added to bed the pipe on, the pipe, even thought it was only 20mm needed pining down with stakes to keep it straight, a second layer of sharp sand was put on top of the pipe, then a marker warning tape followed by a bit more sharp sand, all compressed at each stage by a size 9 boot.
I used Levingtons essential top soil to fill the remaining trench, the first layer is compressed well down, the second and final layer is loosely laid so that when I place the cut turf back and ‘persuaded’ it down with the back of my shovel, the soil has somewhere to go.
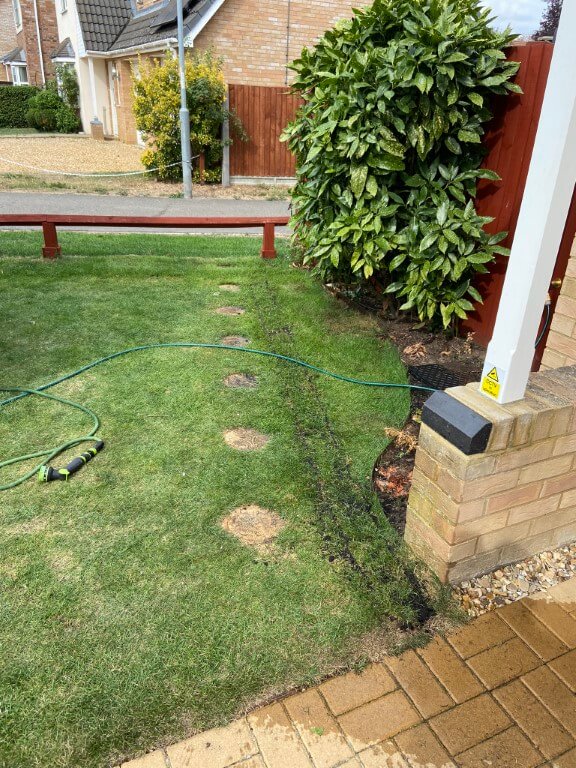
When the turf was re-laid a sprinkling of top soil was added to fill the joins and brushed in, then liberally watered.
The tools used to dig were :

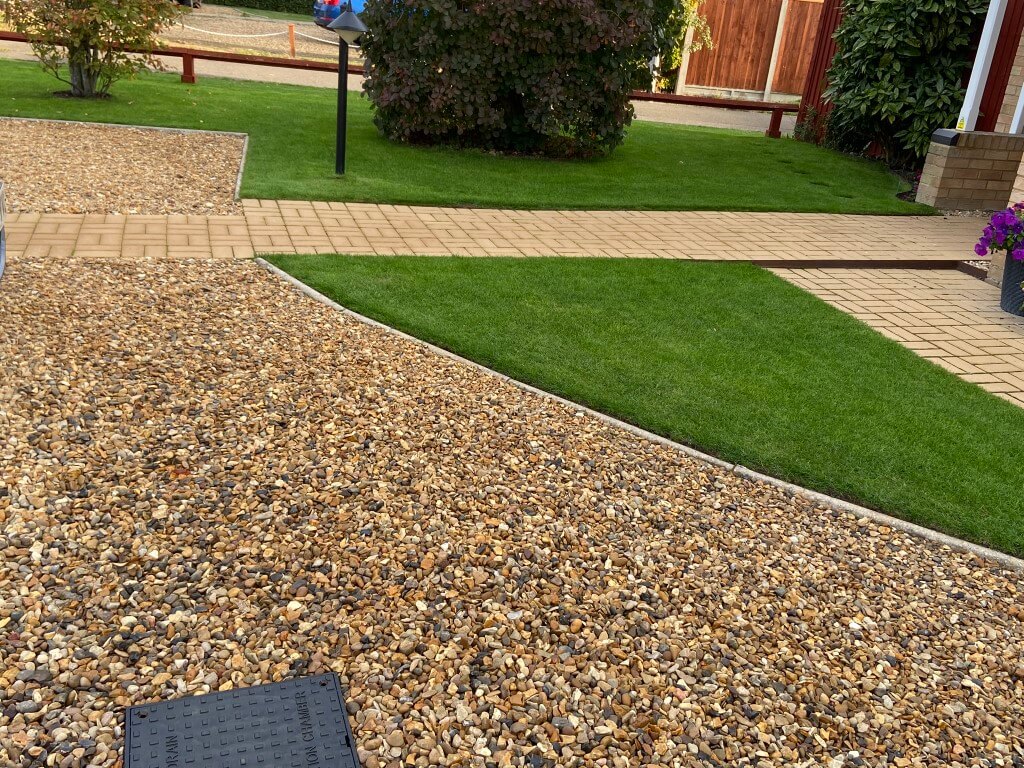
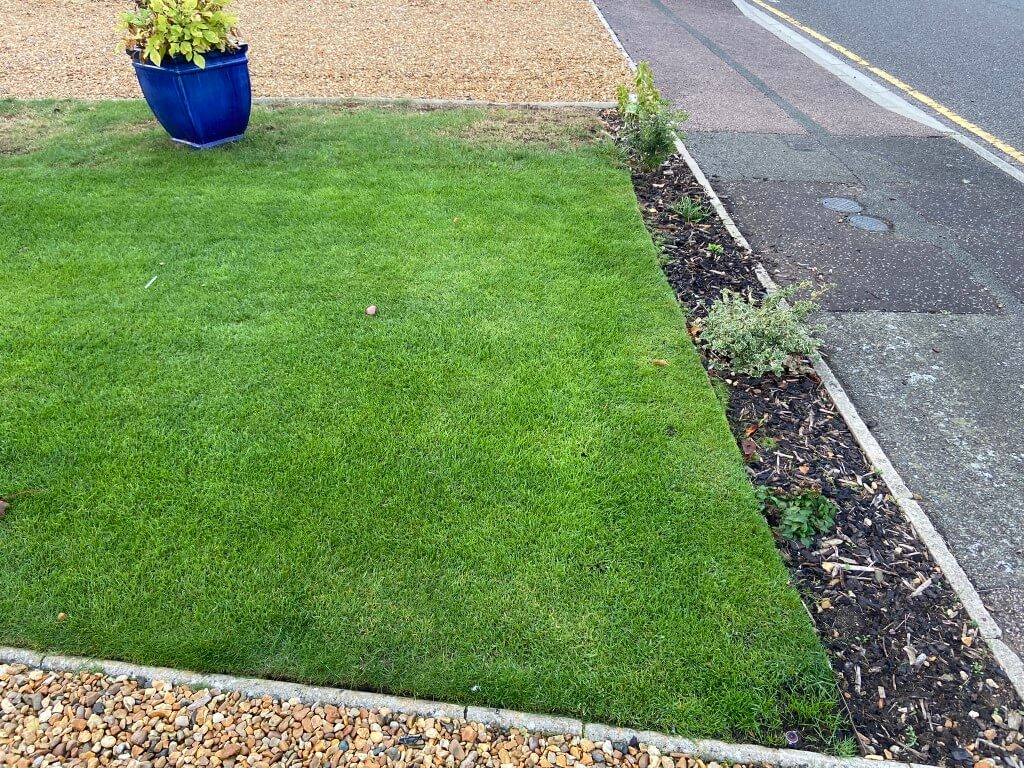
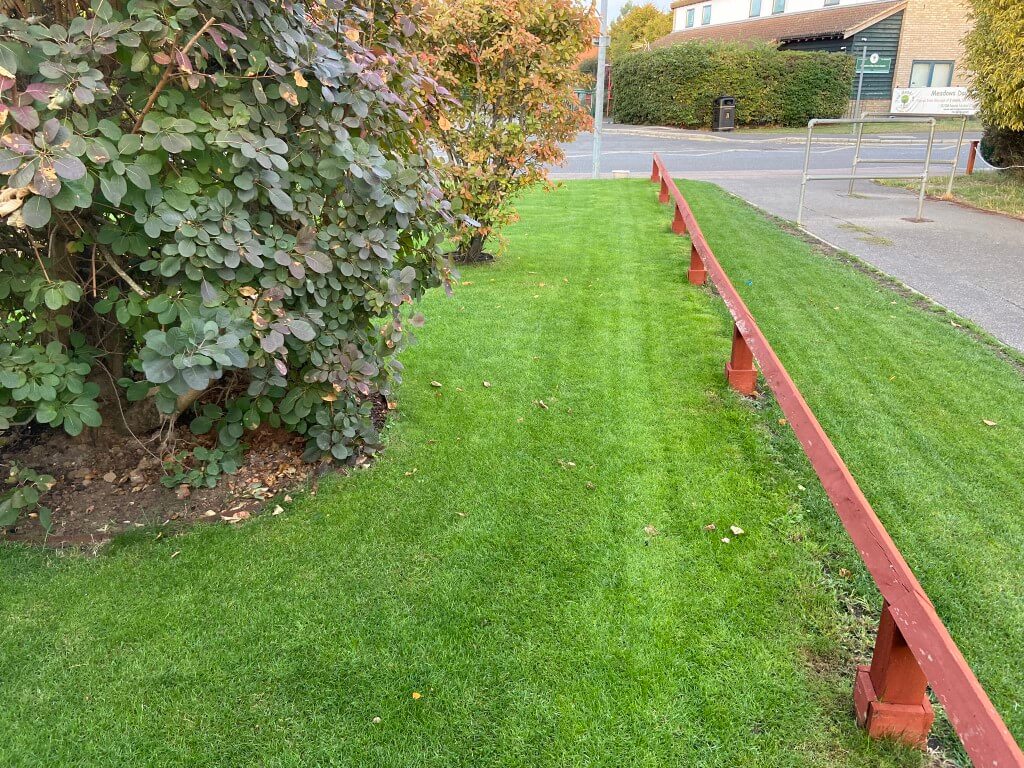
Above images are after a month of the sprinkler feed pipes being buried, showing just how resilient grass is.

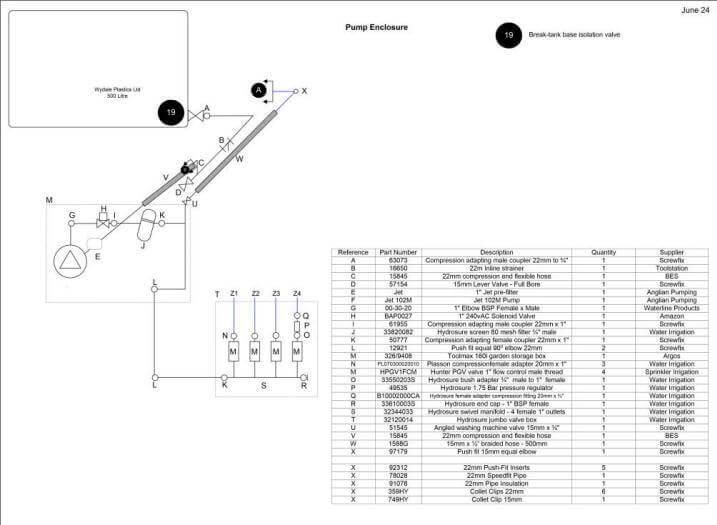
Break-Tank & Pump
The volume of water storage available to you influences how many sprinkler heads you can have on at any one time and for how long before the the pump runs dry as it draws out more water than you are capable of putting back in it, this is a key limiting consideration for a watering schedule as a tank recovery time must be factored in.
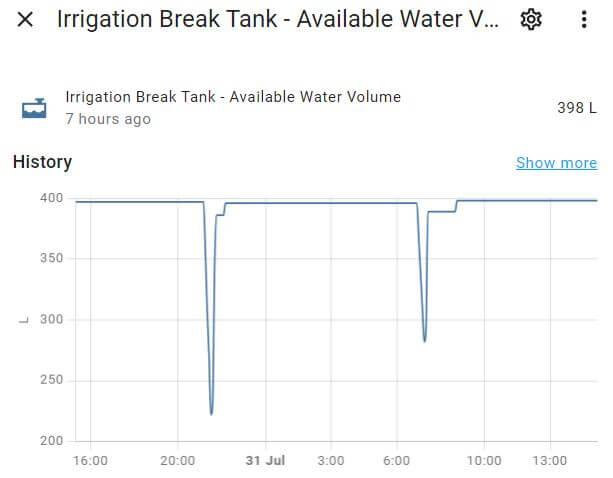
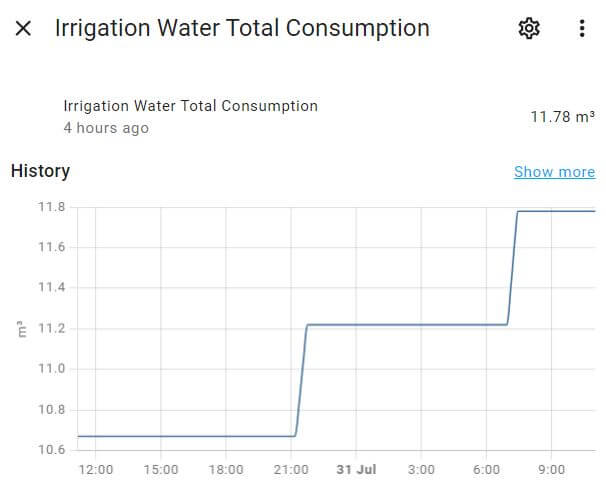
The above graphs show Break-Tank water depletion and water filling volume during two irrigation cycles, note how the same volume has been replaced in both cycles, but the break-tank level was lower in the evening than in the morning, this was due to the incoming water pressure being reduced and the subsequent reduction in tank replenishment.
The tank used is a Wydale Plastics 500 litre upright water tank bought from Facebook Marketplace for £40 , this is perfect as my break-tank.
The term break-tank means their is no direct connection to the incoming water supply, the water filling float valve is positioned to maintain an air gap to eliminate any back-syphoning cross-contamination risks with the incoming drinking water supply.
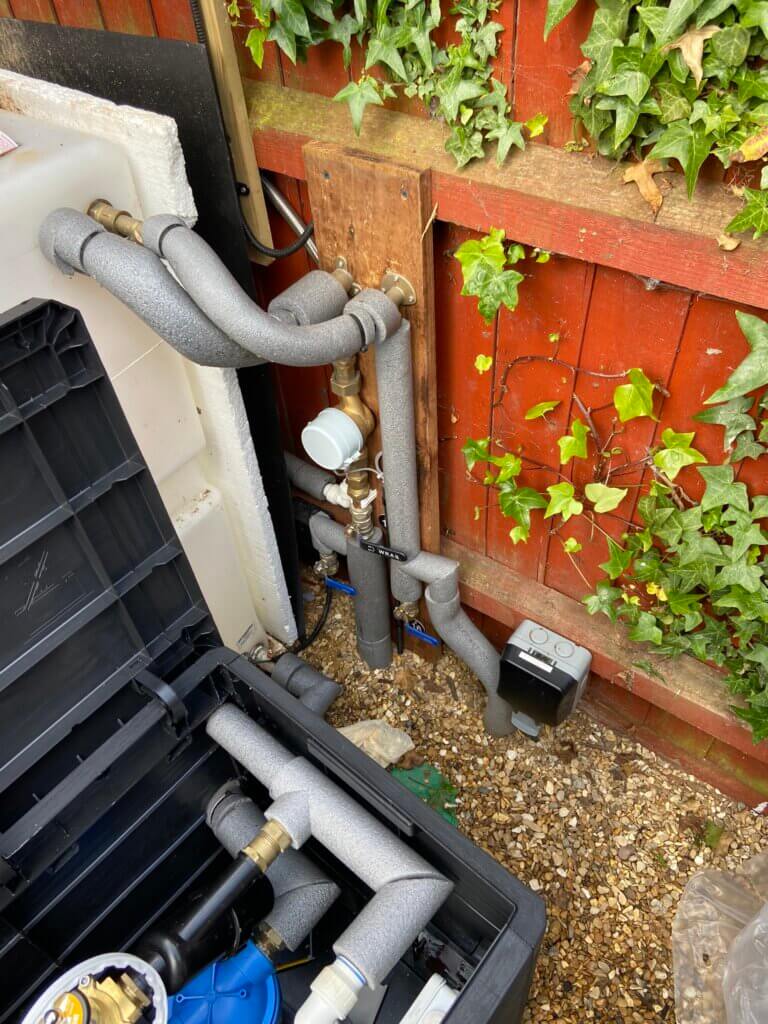
On my system, the break-tank can be filled in two ways, the primary method is via an independently metered 22mm supply from the incoming rising main to the 3/4″ float valve on the break-tank, this feed has a full bore isolating valve, double check valve and drain valve in-line for maintenance.
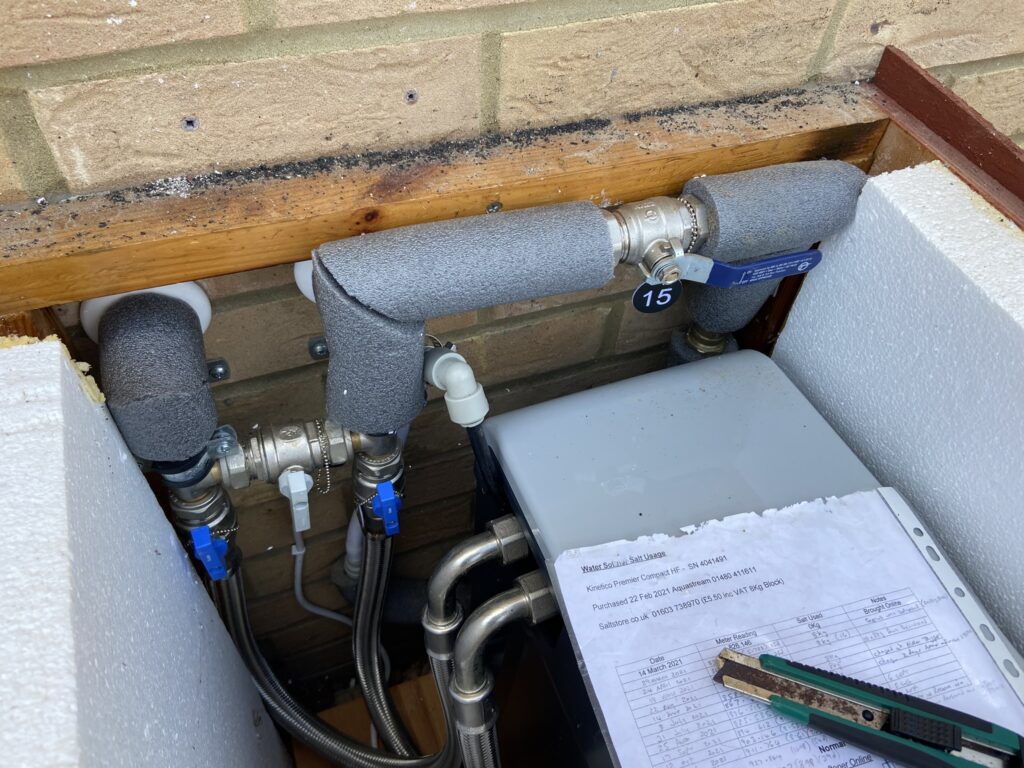
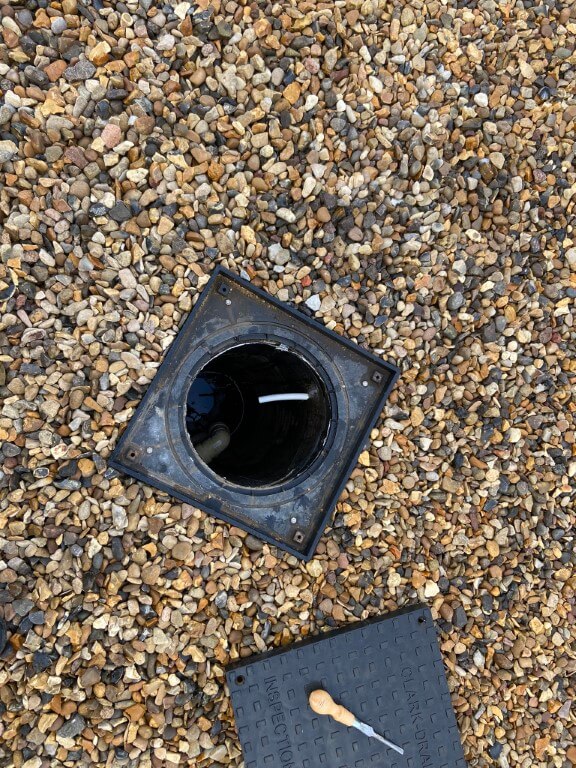
The second means of filling is by using the break-tank overflow line in reverse and pump the vehicle inspection pit water through this, (white 15mm pipe) via a ‘Y’ strainer at the tank end, in normal use, the break-tank overflow is into the pit.
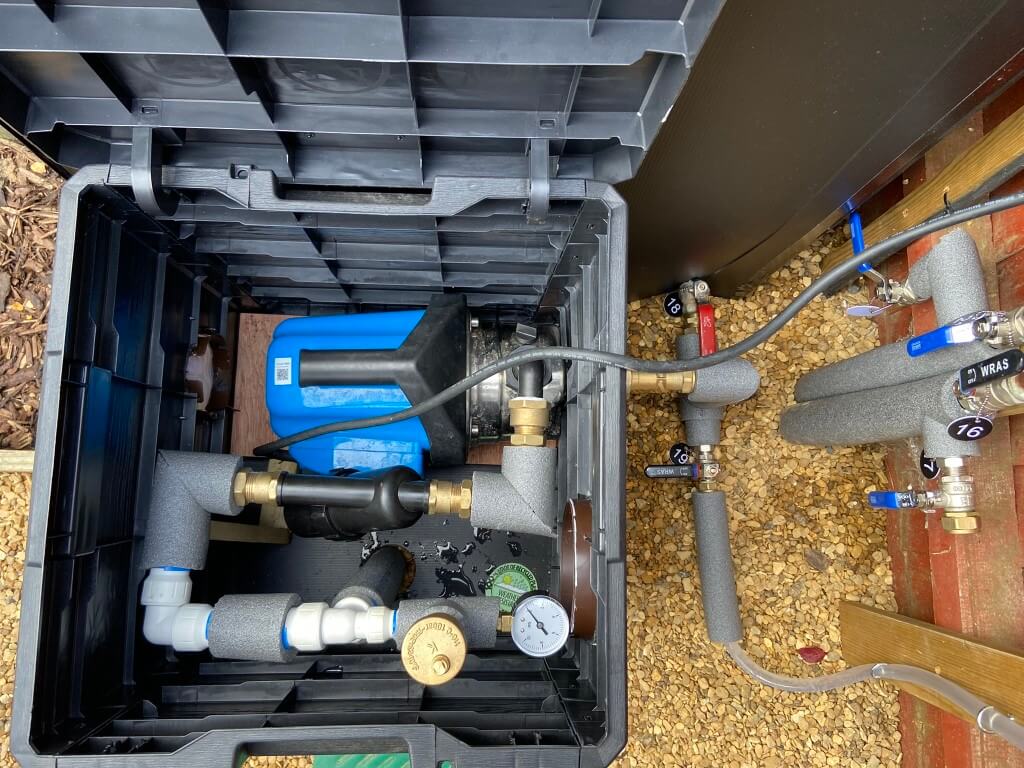
At the base of the break-tank is a 3/4″ full bore lever valve feeding a 22mm pipe with a 80 mesh ‘Y’ strainer fitted, the connection from the ‘Y’ filter to the pump suction line is with a 1″ flexible hose, connection to the pre-filer from the suction line is with a 1″ to 22mm adapting coupler (Screwfix 61955) .
The pre-filter is a Clarke PF1, 5 micron filter and comes with bowl removal spanner, the filters 1″ BSP pitch’s is quite course so a good sealant is required, I used a combination of PTFE tape and pipe thread seal (Screwfix 4373J).
I understand from Machine Mart who sell the Clarke pre-filter that replacement filter elements cannot be supplied.
Due to inadvertent prolonged running of the Clarke SPE1200SS original pump and its subsequent damage, I decided to ‘bite the bullet’ and buy the pump I should have got first time round!
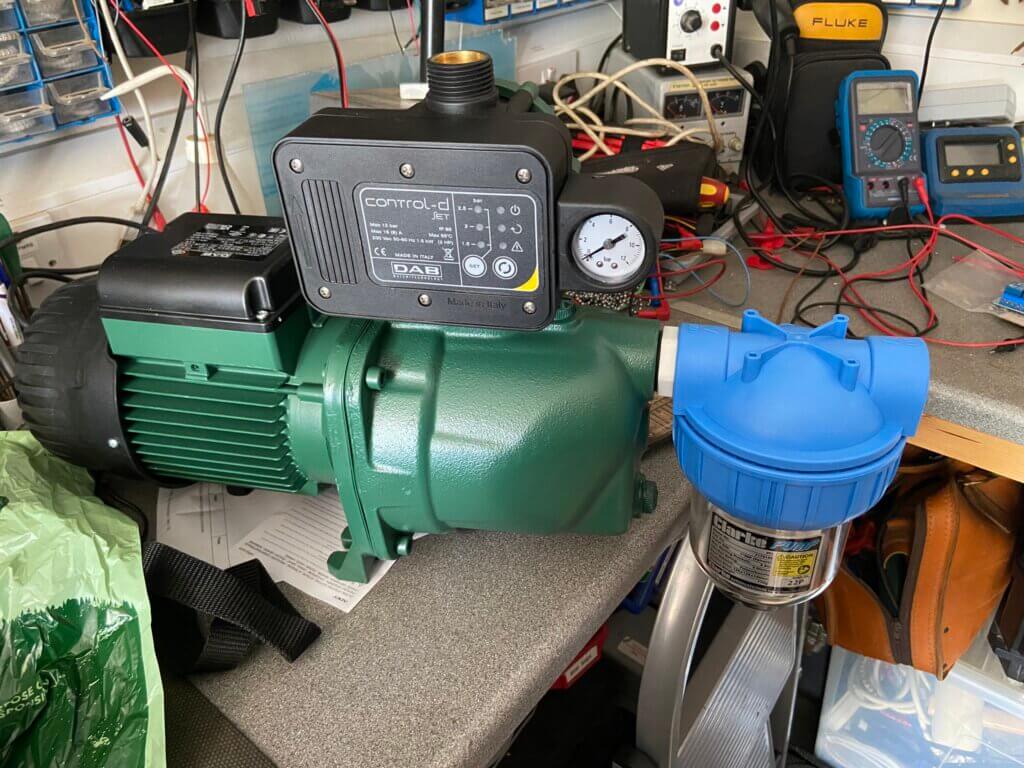
Anglian Pumping supplied a DAB Jet 102M with a maximum 6bar delivery pressure (87psi), referring to the data sheet this will give enough pressure to operate all the sprinklers at the same time, something the Clarke SPE1200SS didn’t have capacity for.
In order to prevent the same scenario which caused the failure of the Clarke SPE1200SS from happening with the JET 102M, I bought a DAB-G-SET controller, this stops the pump if it detects dry running or seizure.
After the pump delivery is a 1″ solenoid valve which is normally closed, then an 80 mesh inline filter before the zone valve manifold.
The solenoid valve acts as a main valve before filter and sprinkler valve manifold, with the solenoid valve closed, the pump will run-on until the water pressure reaches 1.5bar, at which point it stops.
When a signal is sent to open the solenoid valve and then the sprinkler zones valves, the pump controller will register to drop in water pressure and turn the pump on until all the valves are closed.
With all valves closed, the pump will run-on slightly to reach 1.5bar and stop, ready for the next watering sequence.
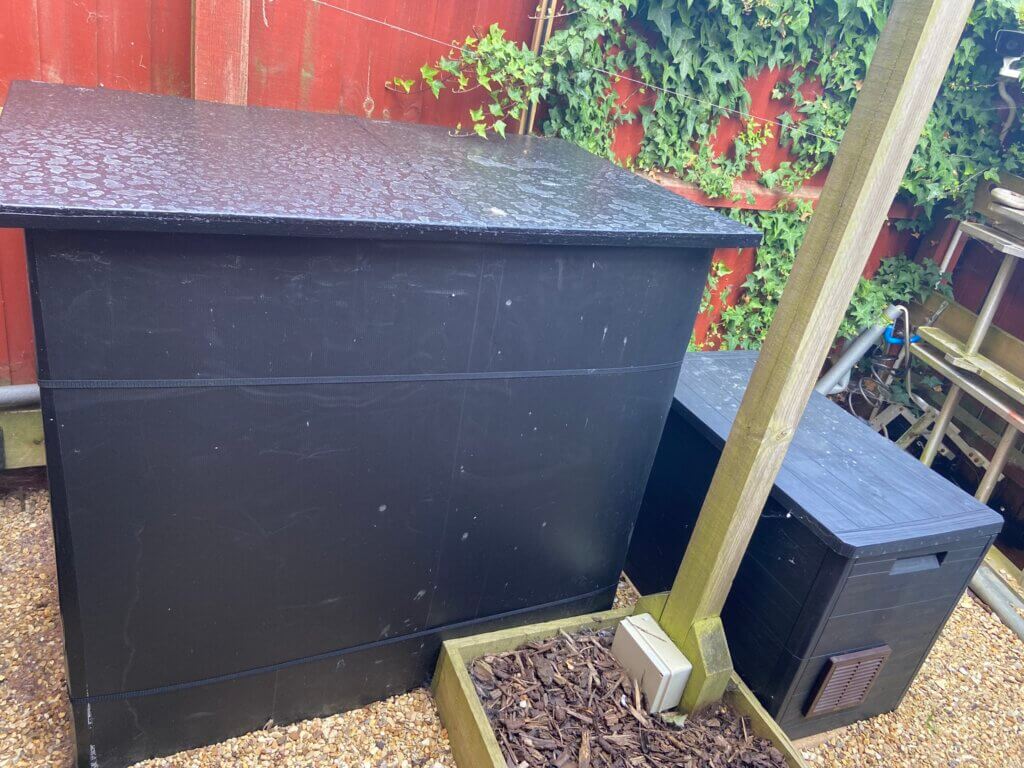
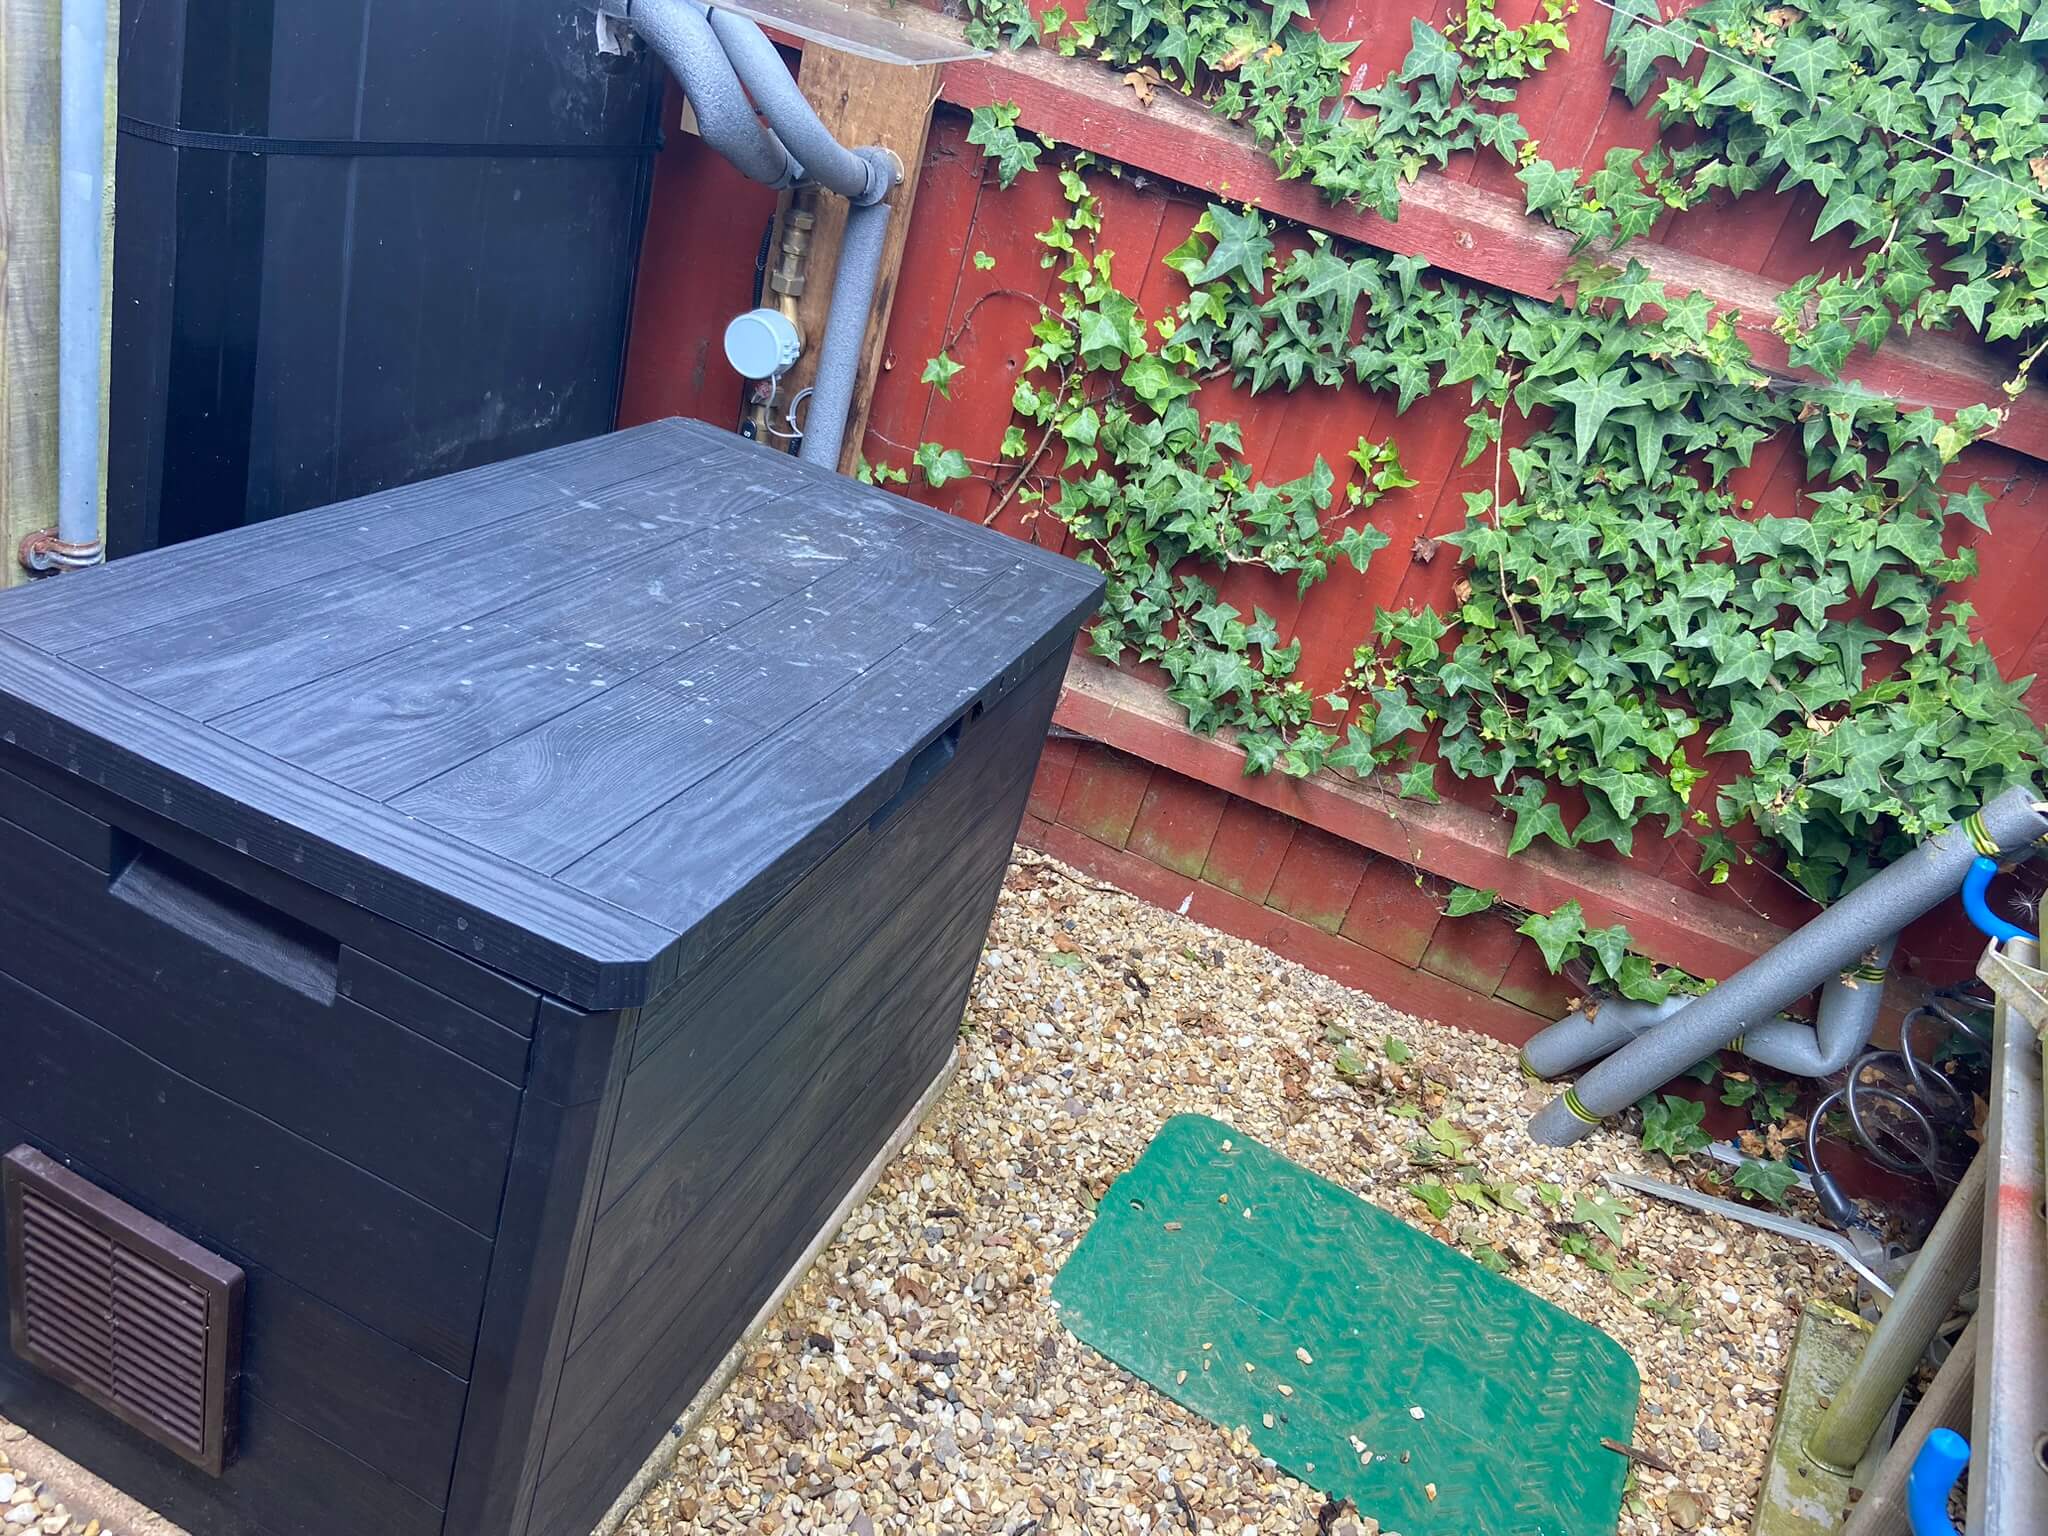
To eliminate sunlight getting to the break-tank in order to stop water borne algae growth which will eventually block the water filters, I decided at this point to insulate the break-tank even though it will be empty over winter.
I used 25mm polystyrene sheets to insulate the break-tank and to weatherproof this, I used black opaque floor protective sheets from Wickes which was perfect all held together with Lidl black duct tape:
In a ‘Normal’ setup, the pump is connected to a plug via the pump controller and that’s it, however, I wanted to monitor and control certain parts of the system using Home Assistant.
Below is an image of the first irrigation pumping system before upgrade:
Sprinklers & Water Usage
The sprinkler assembly comprises of the spray body, sprinkler head and a water inlet, I opted for the Hunter PRS40 body with an assortment of MP Spray Rotator heads to suit my application.
The benefit of using PRS40 body is that it has an inbuilt pressure reducing valve giving me flexibility on the pump pressure, the body limits internally the water pressure to the sprinkler head to 2.75 bar (40psi) which correlates to the sprinkler head data for spray patterns and water usage, this means that as long as the water pressure is greater than 2.75bar to the body along the pipe run and at the furthest point, everything should work as designed.
The spray bodies water inlet is a female 1/2″ BSP, in order to connect to the irrigation main line, I used a Sprial Barb fitting – 1/2″ male elbow (Stock Code SF-SBE-050), two are needed, one on the spray body, the other for the 20mm pipe fitting.
A semi-flexible pipe links the spray body and main feed pipe, this pipe is called Swing or Funny Pipe (no idea why!), the code for this is SP30. Part codes used are from Sprinkler Irrigation.
My system uses 15 sprinklers with MP rotators:
- 1 x MPSS530 – Side Strip pattern
- 1 x MP2000 – 900 – 2100 pattern
- 1 x MP1000 – 2100 – 2700 pattern
- 12 x MP1000 – 900 – 2100 pattern
Water consumption per sprinkler head is dependent on the adjusted coverage pattern, the rotator data sheet enabled me to work out the expected water volume, data also exists on the Growinsane website regarding emitters l/m, again this is dependent on adjusted flow at the specific emitter.
- Total front lawn – design usage 19.2 l/m, measured usage 21 l/m
- Rear planters and pots – measured @ 16.6 l/m
The Hunter MP Rotator data I used can be found HERE, however, a revised Metric version is HERE.
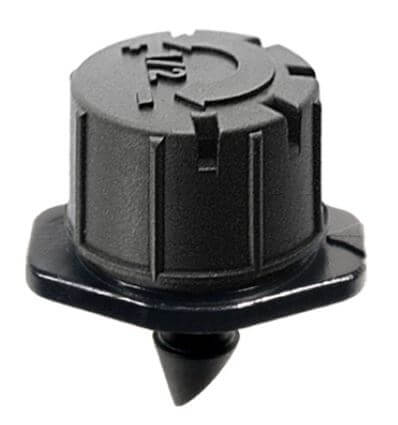
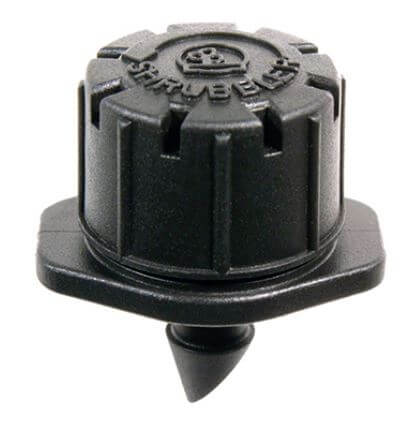
The rear garden has a number of the following emitters, the l/m value is for each emitter:
- Emitter – Shrubbler 3600 – 4mm barb @ 0.55 l/m
- Emitter – Potstream adjustable – 4mm barb @ 0.36 l/m
- Emitter – Shubbler 1800 – 4mm barb @ 0.28 l/m
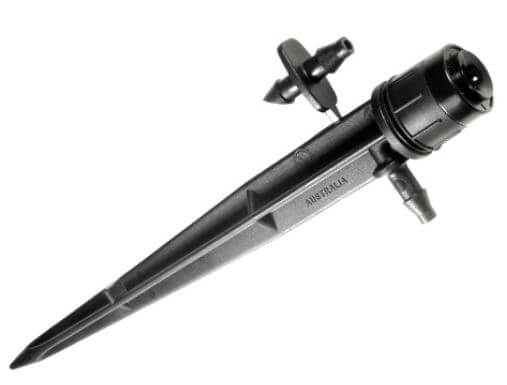
- Emitter Spike – Spectrum 3600 – 4mm barb & adapter @ 1.06 l/m

Watering
I ‘tweak’ and constantly review the ‘run times’ now I understand how effective the sprinkler head patterns are at delivering the required volume of water to the lawn and plants

The volume of water filling the gauge drives the watering run time as I’m looking for an average total of 25mm per week on the lawn, (this is a cumulative total and will include rainfall).
The MP Rotator heads deliver a soft watering pattern to avoid runoff and enable the water to soak in, using water gauges placed at random places across the lawns, the average water collected over a 10 minute cycle was approximately 4mm.
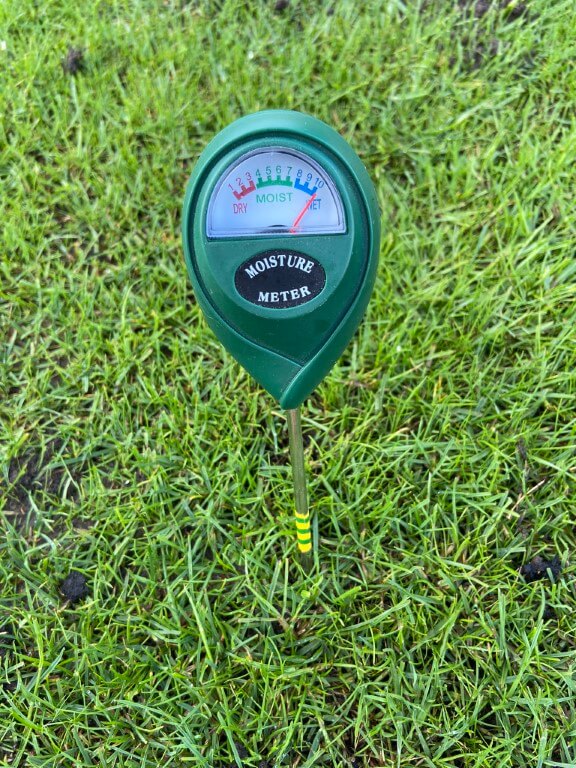
This means that just over an hour of irrigation will give me the weekly total of 25mm, however, I spread the watering periods over early mornings each day as a minimum, if the lawn shows signs of distress, I increase the watering frequency as the whole topic is a ‘black art’ and along as my moisture meter is happy, so am I.
2023 Lawn Watering Cost – Budget for it!!
I started a watering schedule in April, this schedule, (duration and frequency), varied based on when I over-seeded and if we have had rain, another consideration was the lack of rain coupled with high temperatures, lots of variables all contributing to evapotranspiration!
The actual cost for running my 15 sprinkler heads for a 117m2 lawn for 10 minutes costs £0.65p per day, this cost is made up of water charges and sewage/foul costs.
To water my lawn for 7 days to give me >25mm costs £4.55 per week.
Where it started to expensive was when it didn’t rain, obvious really :-), Example – June 2023 was a dry, warm month, with only 5mm of rain measured, so with a bit of over-seeding and to keep the rest of the lawn growing, I used 26.8m3 of irrigation water from the 4th June to the 22nd costing £4.54 per day.
The costs used are based on Anglian Water, June 2023 charges, 1m3 (1000 litres) costs £1.68p, add to this the sewage/foul costs which are based on 90% the water used and cost £1.71 per m3.
Update – 2 October 2024
Having taken advantage of the water authorities ‘New Lawn’ allowance before but I didn’t know until a chance conversation that you can request a ‘Sewage Abatement‘ for that does not use the drains, e.g. Irrigation & swimming pools. So instead of a 90% levy, this drops to 10% per 1m3.
I spoke to Anglian Water and they simply record the fact you have called and at the end of the season you let them know how much water you have used on the lawn, I have a sub-meter for my irrigation system, but I double check this against my main meter, once the readings are given to them, they will calculate the rebate.
At the end of the 2023 season I spoke to Anglian Water and my account was credited with £91.66 for irrigation water used, result 🙂
At the end of the 2024 season I spoke to Anglian Water as they still had my usage details, the process was simple and my account was credited with £44.38 for irrigation water used, the two main reasons for the lower cost was I used harvested stored rain water and poor summer.
Pipe Sizing
This is probably the most critical element, if any of the pipes are undersized, then the pressure drop at the furthest point may make the system unusable at worst or poor forming at best.
The information I had was, as a rule of thumb, that a 20mm pipe will pass 1000 litres/minute (l/m) and a 25mm pipe will pass 2000 l/m, as I had independent zone control, with the highest water demand zone taking less than 9 l/m, I went with 20mm MDPE pipe as the flow rate, pressure and pipe length all worked out fine for my lawn.
It turns out that the sprinkler head water volume is when the head is at its full design pattern, a number of the heads in my system have had the coverage tailored to my lawn, therefore the water consumption is slightly lower, the DAB Jet 120M allows me to have all 13 sprinklers on at the same time with no adverse effect on water pattern coverage as the pump pressure is healthy.
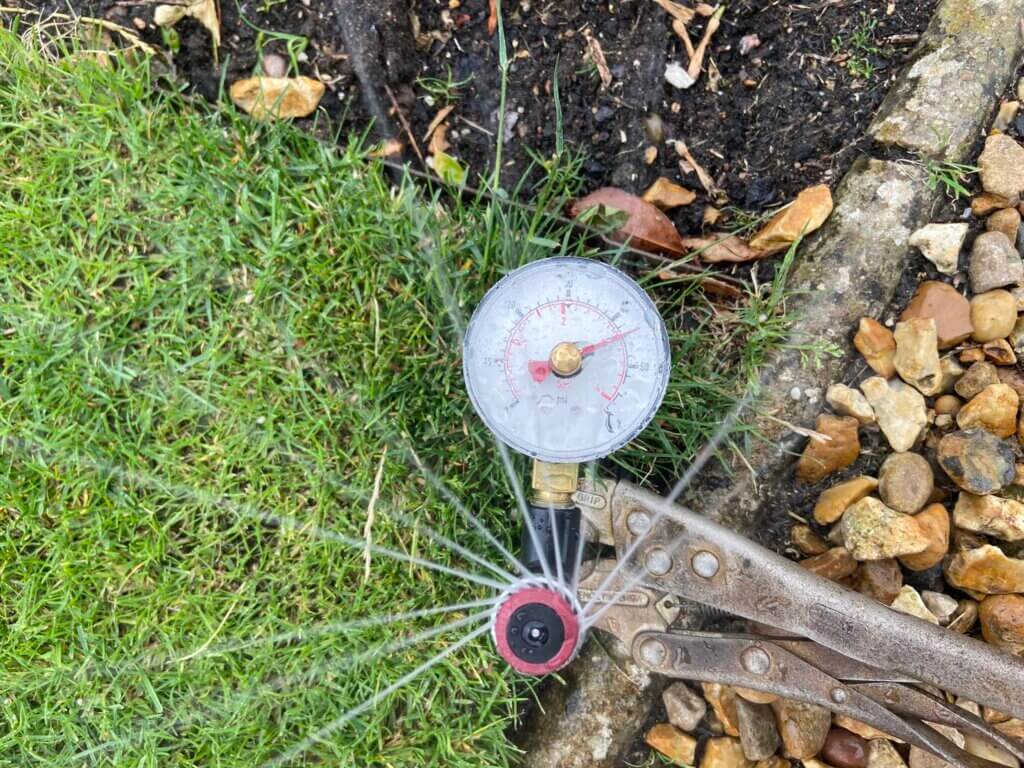
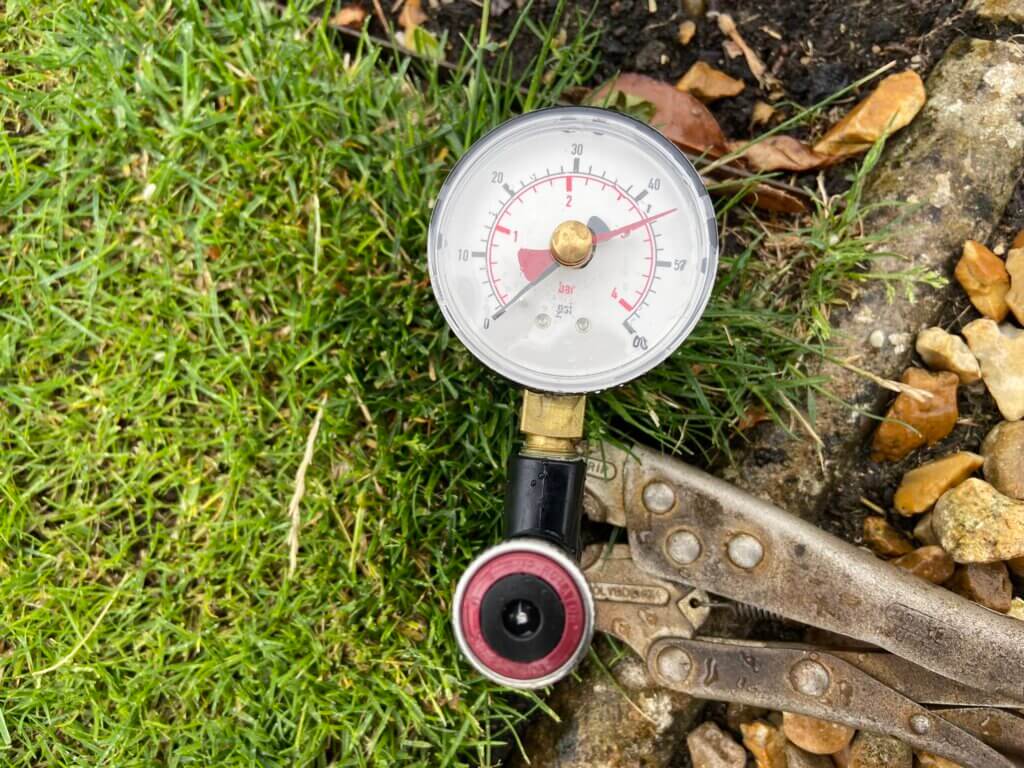
As stated earlier, the Hunter PRS40 bodies have an integral pressure reducing valve so they operate at their optimal water pressure which is 2.75bar (40psi), it is important therefore, that the pressure reaching the spray body is => than 2.75bar.
The above reading of 3bar pressure was with all sprinklers working, if I turned on the rear garden watering line as well, the pressure expectedly dropped and recover to 2bar recovered, however, as this is below the optimal sprinkler pressure, I’ll ensure the sprinkler schedule does not have all four zones on at once.
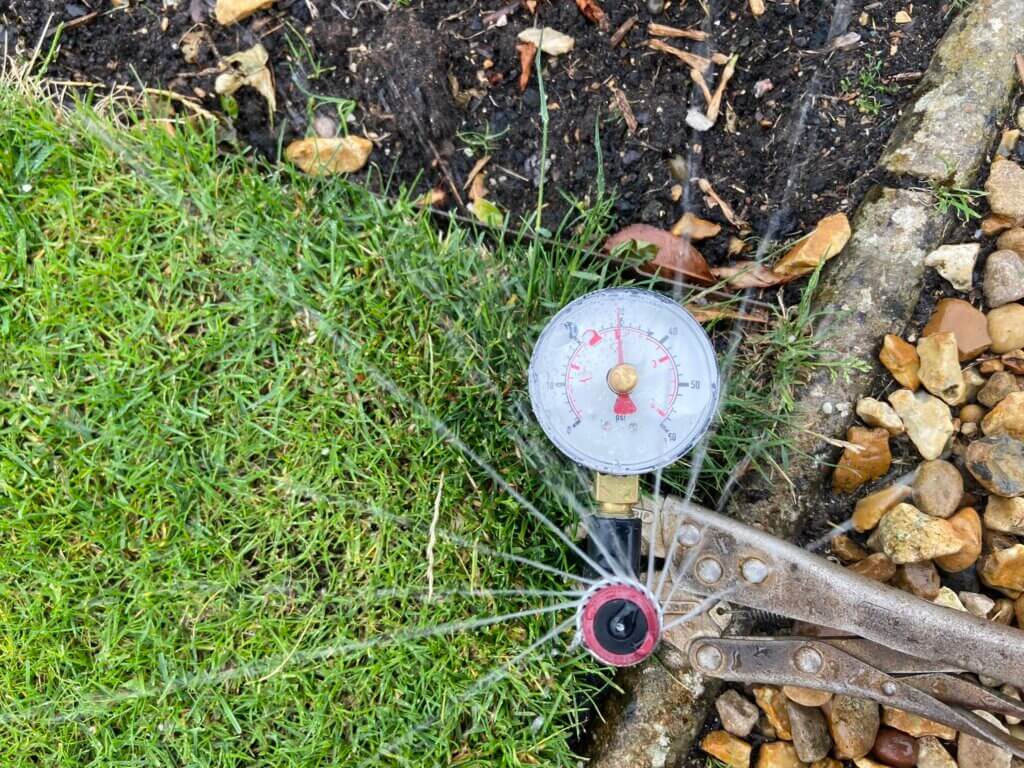
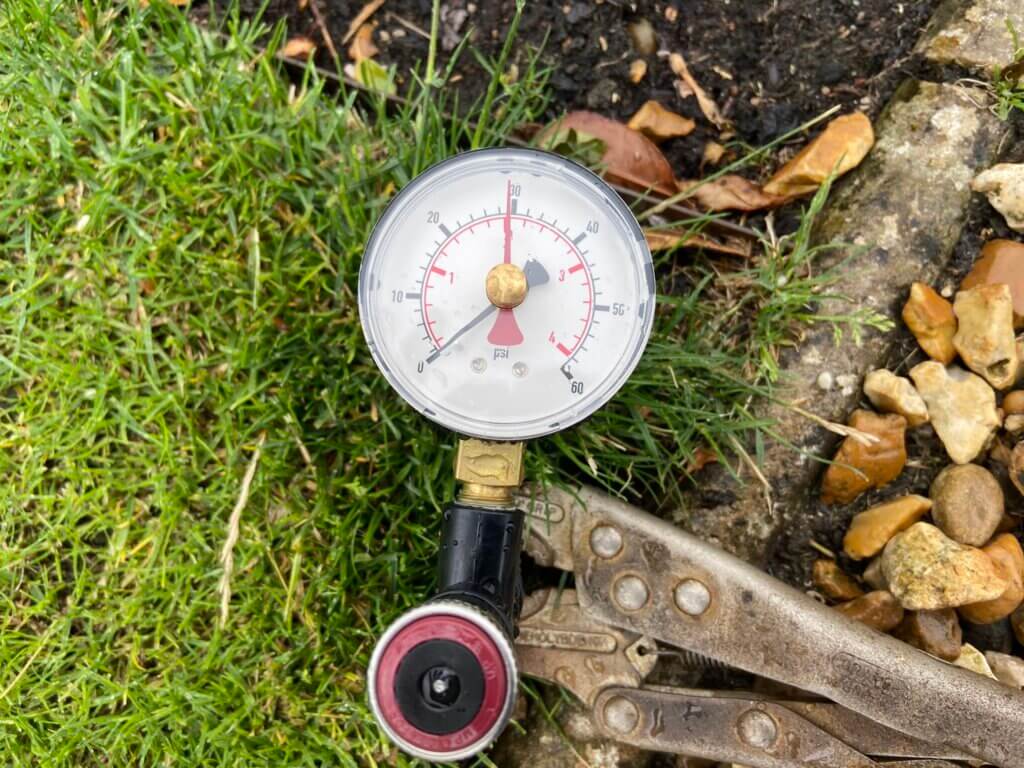
Pressure readings were taken using a MPADAPTER which allowed me to measure the dynamic pressure reaching the furthest sprinkler heads on each zone, determining if => 2.75bar pressure is being achieved, which it was :-).
The majority of pipe fittings were from waterirrigation, MDPE pipe 20mm compression fittings require pipe liners (inserts), to stop any deformation of the pipe in the fitting, I was told it was ok to omit this, but as the liner are cheap, I didn’t think it was worth the risk of a leaking joint at some point in time.
Getting a clean, square cut on MDPE pipe is important as it gives a good face for the liners lip to sit against and also it makes insertion past the fittings ‘O’ ring easier with a reduced chance of seal damage, to get a clean cut I used pipe shears from Lidl for £9.99.
Jump Link to parts used.
Zoning
For the greatest flexibility and water consumption distribution, I decided on 4 zones, (from left to right in the valve box):
- Zone 1 – Left Lawn Upper (4.82 l/m)
- Zone 2 – Left Lawn Lower (8.76 l/m)
- Zone 3 – Right & Centre Lawns (5.65 l/m)
- Zone 4 – Line/Drip Irrigation (1.75bar pressure reducer fitted)
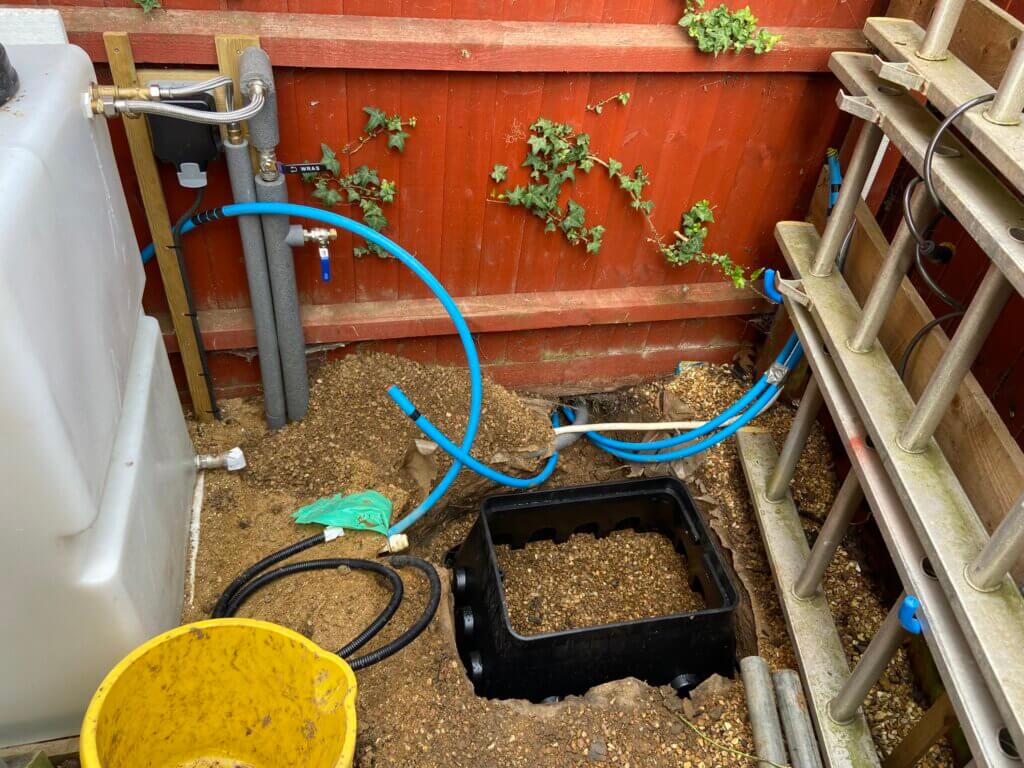
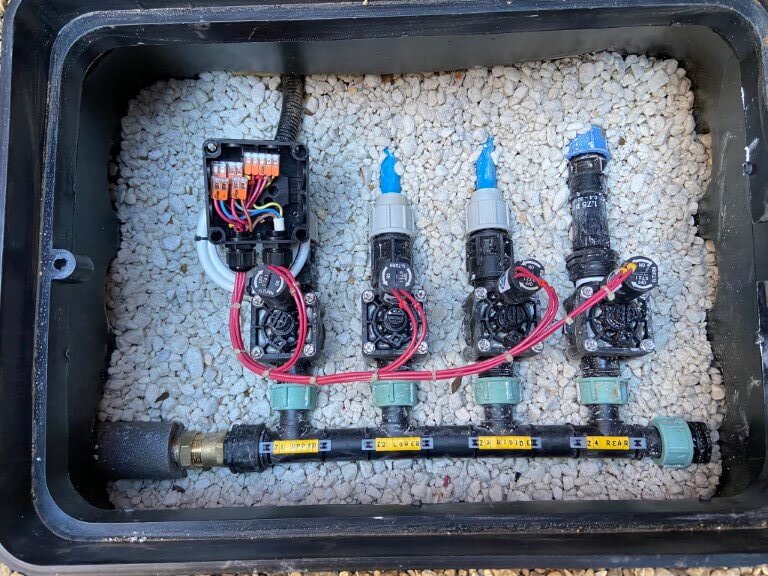
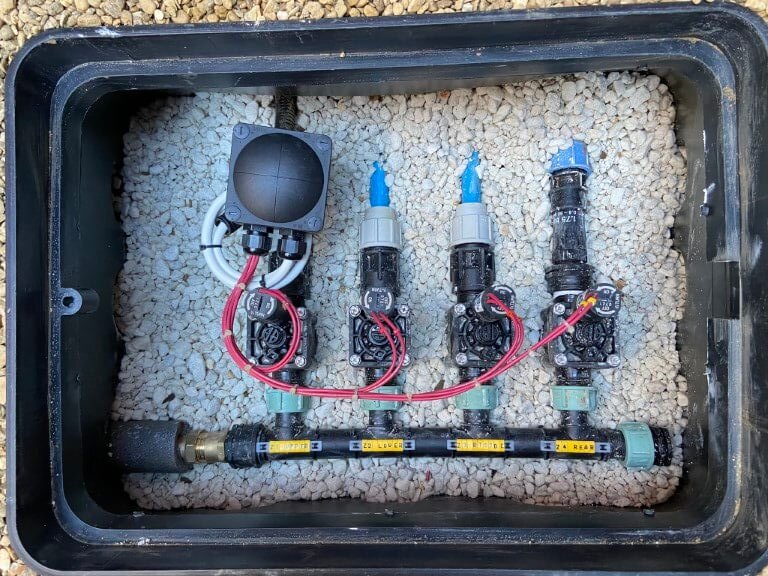
- The valve box roughly laid out to ensure ease of working on and that it left room for the pump enclosure.
- Irrigation lines roughed in and trimmed, also the correct depth dug to accommodate the valve box ensuring that the lid would be at the correct height above the ground.
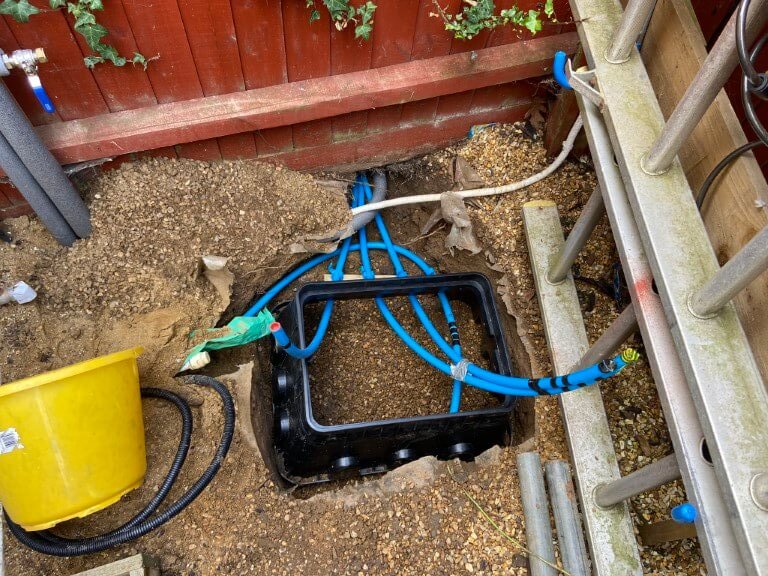
- I used a wooden baton with pipe clips spaced at the valve outlet centers to keep the irrigation lines in the correct position without causing any strain on the valves.
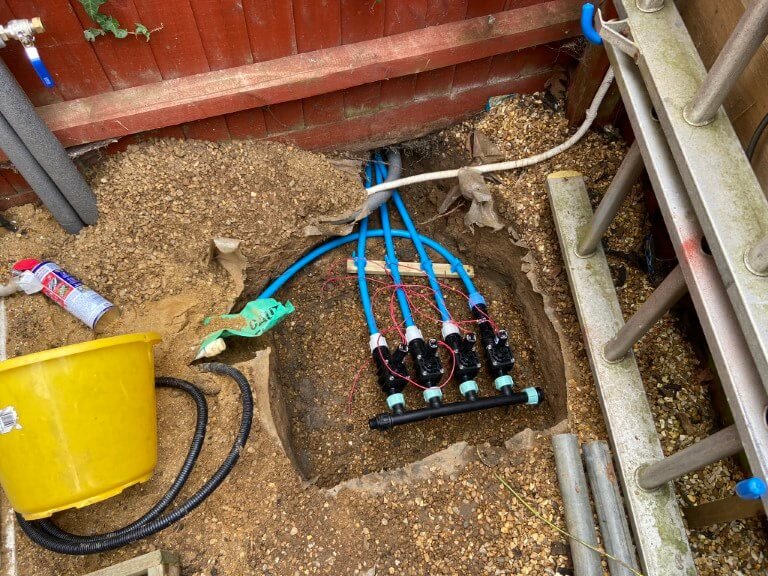
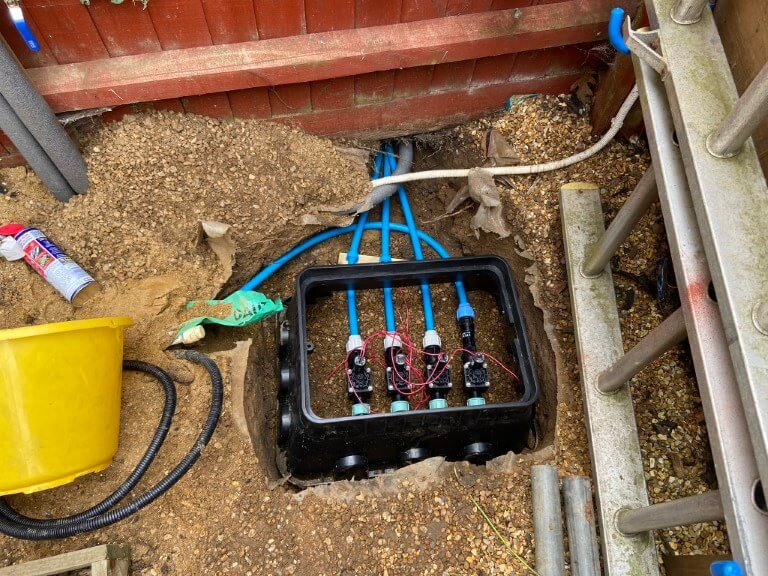
- After the pipe were connected to the valves and the valves to the manifold, the valve box body was notched to accept the pipes and then placed over the completed assembly, rather than work with the box in place.
- Valve box all levelled and backfilled with pea gravel, decorative white stone is inside the box as I think it looks good, a 25mm conduit was ran from the controller to the valve, through this passes a 5 core 1.0mm2 cable, one core for each valve solenoid and a common return. All connections were made in an Wiska-Combi 308 IP66 rated enclosure filled with Magic-Gel after termination.
- All tested and ready for closing up.
Control
Water to each irrigation zone is via Hunter PGV solenoid operated valves, these need 24vAC to operate, applying 24v will open the valve, with no voltage present, the valve will be in the closed state.
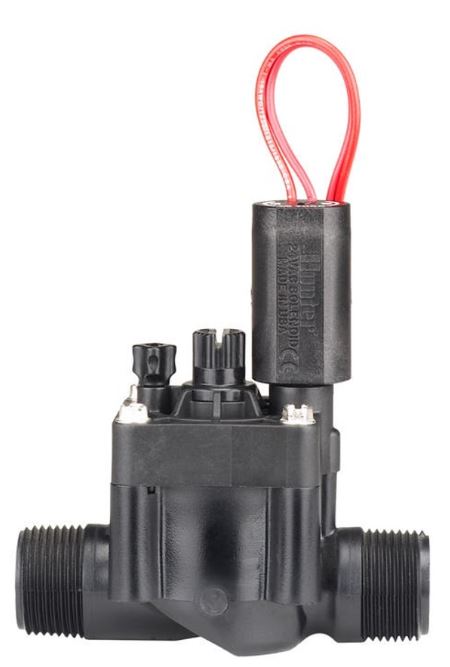
ELECTRICAL SPECIFICATIONS 606800
• Minimum opening/operating voltage: 19 VAC
• Maximum recommended voltage: 28 VAC
• Current at 24 VAC:
• 370 mA inrush, 210 mA holding, 50 Hz
• Maximum operating pressure: 15.17 bar; 1517 kPa
• Wire leads: 45 cm of 0.8 mm2 UL-approved wire
Hunter do make controllers for their range of valves but I decide to make my own using a 4 channel Sonoff Pro2 as the valve controller and a Sonoff Basic as the pump control configured as a ‘scene’.
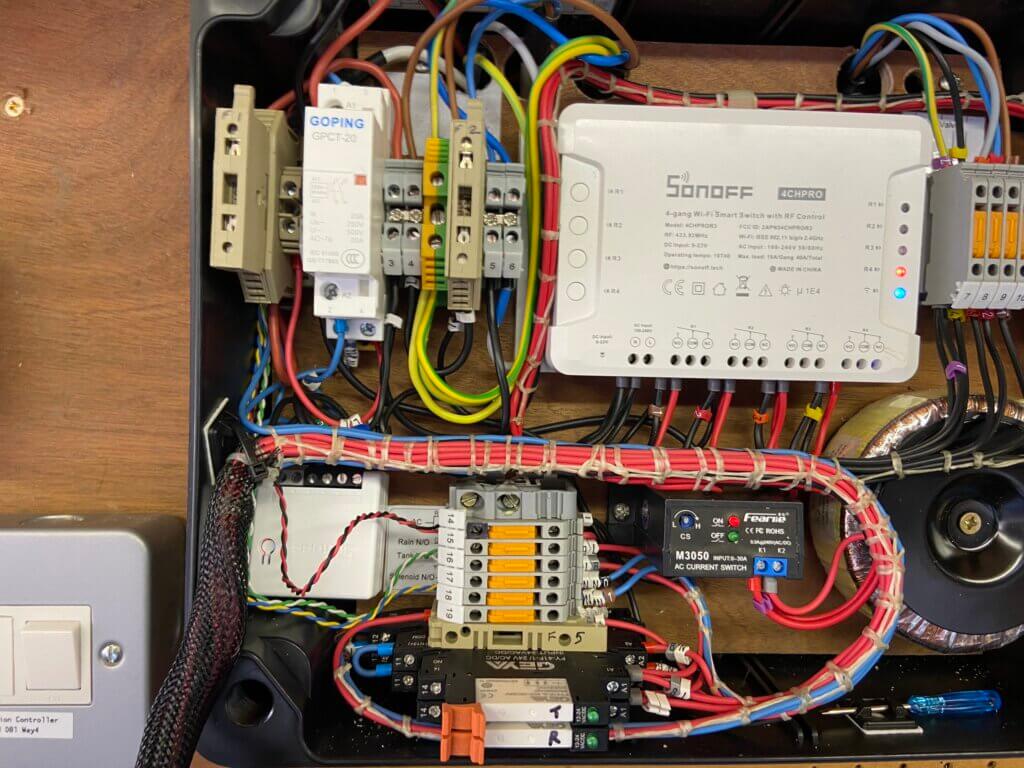
The Sonoff devices are paired to home WiFi and operated through the eWeLink App or dashboard, these are extremely flexible devices and ‘scenes’ can be setup, so that the actions of one device can effect the operation of another.
The channels of the 4 channel Sonoff controls the solenoid of that valve, initially I had the Sonoff set to ‘interlock’ mode, meaning that only one of the 4 channel relays can ever be ON, but once I was able to test the pumps pressure and monitor the sprinklers performance, I decided to remove the interlock enabling greater flexibility of operation.
Sonoff Scene
As this is a new system, I’m working through the best watering times, the ‘scene’ I have currently set, (a ‘scene’ is a pre configured set of events that automatically run when triggered), at 04:00 on Monday, Wednesday and Friday , valves 1 and 2 open for 40 minutes, then valves 1 and 2 close, then valve 3 opens for a further 40 minutes, valve 3 closes and valve 4 opens for a further 5 minutes.
At the end of the 5 minutes, valve 4 closes and the pump turns off.
Before going live with a scene configuration, I use a test rig to confirm operation of a scene before making it live.
The scene below is to manually operate the watering schedule and can be easily ‘tweaked’ using the eWeLink dashboard:
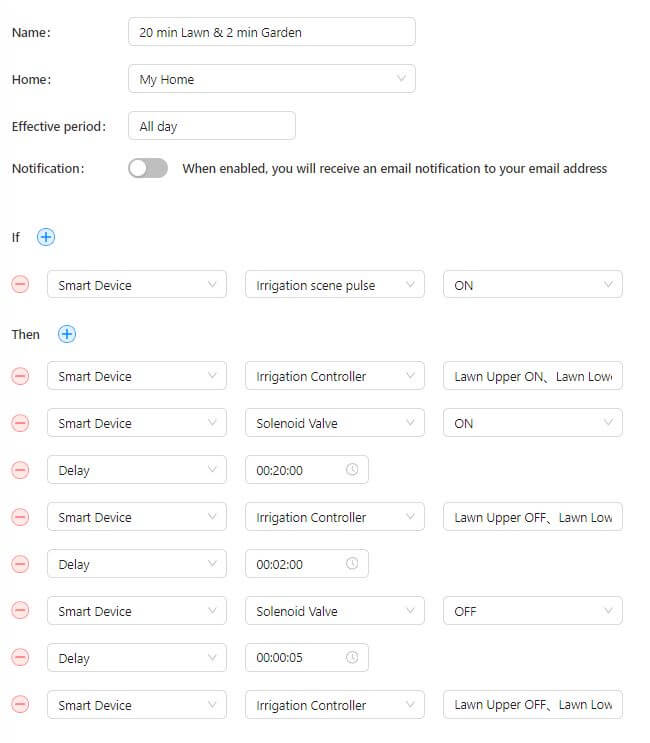
The scene breakdown is as follows –
- The irrigation sequence is triggered by manually operating the app.
- 1st action is for the Sonoff 4Ch Pro relays 1, 2 & 3 to turn ON, this in turn supplies 24vAC to OPEN the control valve solenoids to the front lawns.
- 2nd action is for the Sonoff Basic Smart Device to turn ON and supply power to the solenoid via a contactor, this causes water pressure to drop and the pump automatically starts.
- 3rd action is the Delay of 20 minutes, this is the period of time to elapse before the next action i.e. the valves are ON until the next action
- 4th action, at the end of the 20 minute delay time, Sonoff 4Ch Pro relays 1, 2 & 3 turn OFF and relay 4 turns ON to water the rear garden.
- 5th action is the 2 minute duration that water will pass through valve 3
- 6th action is that after the 2 minute delay time above, Sonoff Basic turns OFF and the solenoid valve closes.
- 7th action is a 5 second delay time before the Sonoff 4Ch Pro turns relay 4 OFF.
- With all valves closed the pump will stop once a pressure of 1.5bar is reached.
I found quite early on that it was important to set up a ‘scene’ to turn OFF the Irrigation Controller relays and Pump as, in my case, access to physically operate Sonoff devices is not possible as they are within an enclosure.
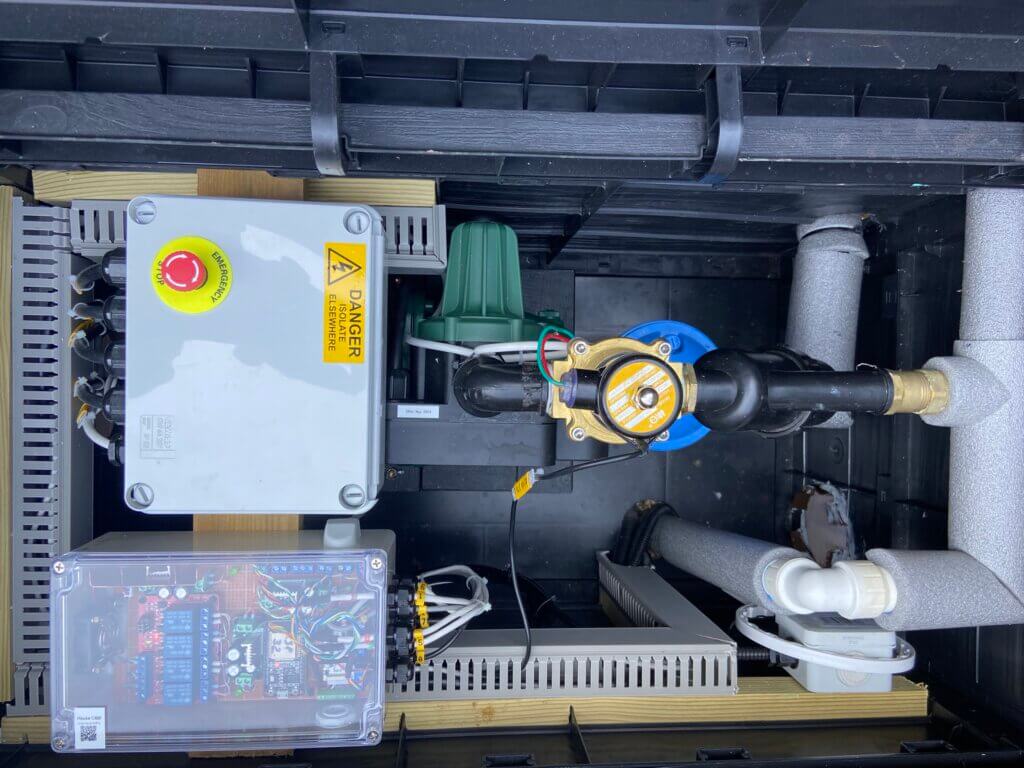
A 230v/24v – (3.75A Max Output) Toroidal transformer is used to supply the operating voltage to the Hunter valves via the 4 channel Sonoff.

Panel shows the irrigation system cycle is running, if the feed water tank is low or if the rain sensor has activated, this will disable the solenoid contactor and the cycle will abort, operating the respective override buttons enables continued running should it be required.
Front panel label, LED lights are from AliExpress, the ‘Pump Running’ LED is switched via a AC current sensing relay with the light only being illuminated when a pre-configured load is being drawn. This gives confidence that the pump is actually consuming power and running, rather than simply powered up.
To make the panel overlay I use Visio to make the image to scale and print to A4 80gm paper, this is then covered in a self-adhesive transparent book covering affixed to the enclosure with double sided tape.
Home Assistant and Interlocks
I’m not a programmer, so I can only use what I know, this ends up a bit ‘clunky’ but it works for me.
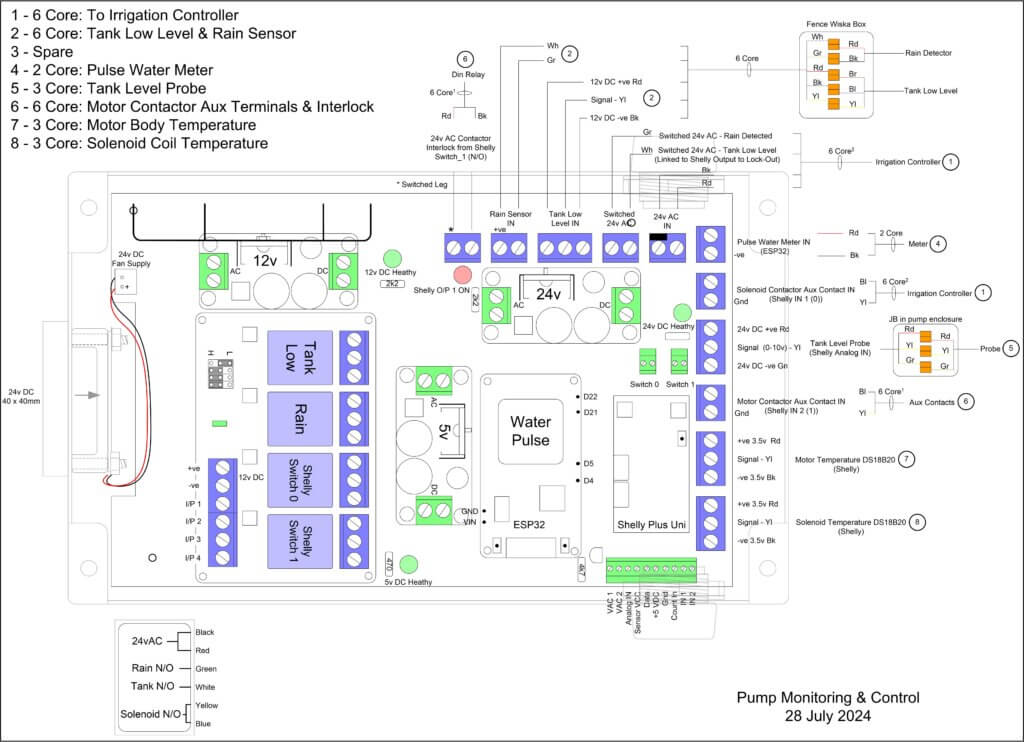
I use Home Assistant to monitor the Break-Tank water level using a submersible hydrostatic sensor from Aliexpress wired to a Shelly Uni Plus, the Shelly also has two temperature sensors attached, one for the motor casing and the other to record the solenoid coil temperature.
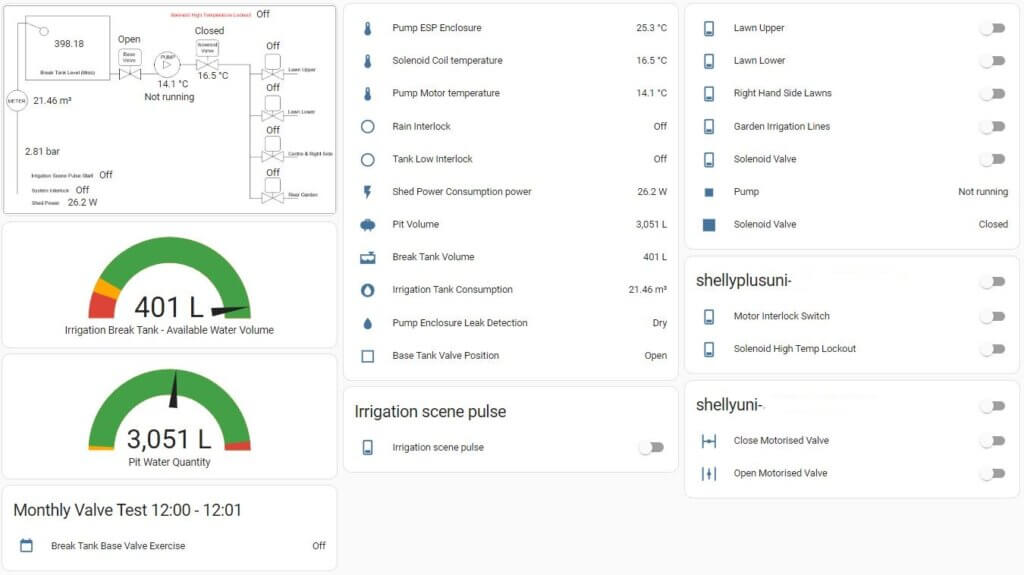
The Shelly Uni Plus is very versatile as it also has two controllable outputs, one of these is to manually open the circuit to the motor contactor, effectively an emergency stop and the other output is linked to the solenoid temperature exceeding 500 C, if it does then the solenoid contactor circuit will open removing power from the coil.
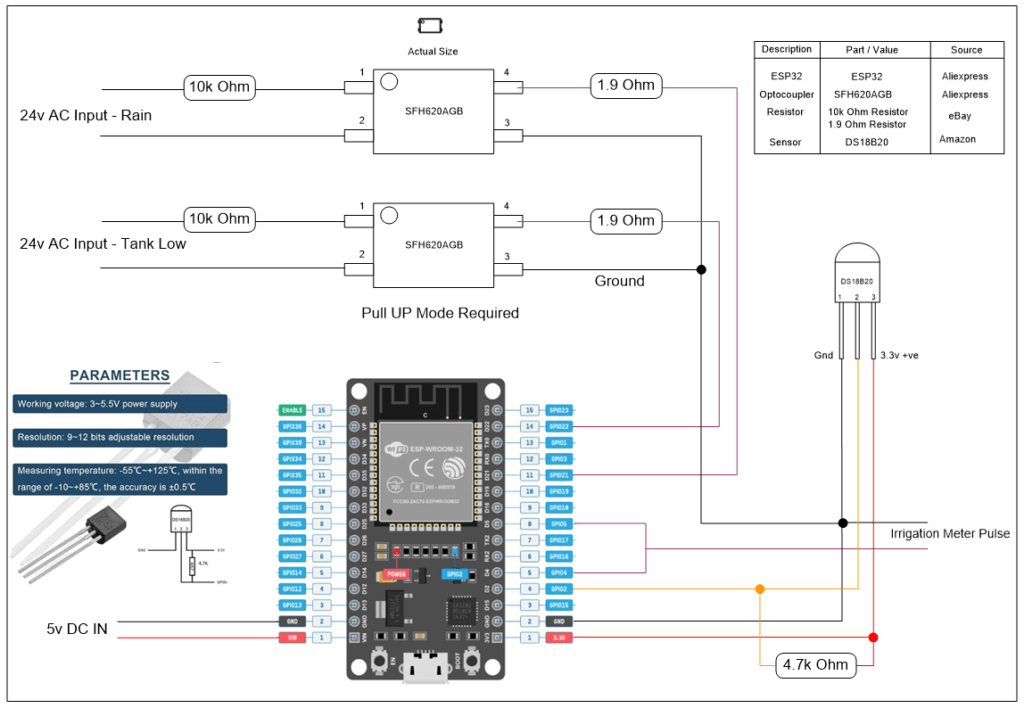
A ESP32 is used to measure the water meter pulses giving me a reading of water volume in m3 used to fill the Break-Tank, I also monitor the internal temperature of the enclosure and the status of the Break-Tank low level sensor and external rain sensor with the ESP32.
Planter/Pot Irrigation
This was the most difficult part of the whole project as I did not have an understanding of the parts, only an idea of what I wanted, fortunately the cost of parts is quite inexpensive, so if I bought the wrong thing it wasn’t so much of a big deal.
The rear garden system starts at the water control valve, the pump pressure of 4 bar is too high and must be reduced, I used a Hydrosure 1.75 bar pressure regulator connected to the 1″ control valve outlet with a 1″ BSP female to 3/4″ BSP female reducing socket, the pressure reducer has a throughput of between 0.4 – 30 lpm.
The reduced pressure irrigation water was fed to the garden via 20mm MDPE pipe, with branches made using Hydrosure compression Tee fittings with 1/2″ female offtakes.
Into the 1/2″ female offtake a Hydrosure Director 13mm x 1/2″ BSP male is screwed in, and from this 13mm LDPE pipe is connected, this is the line into which the micro irrigation parts are pushed into.
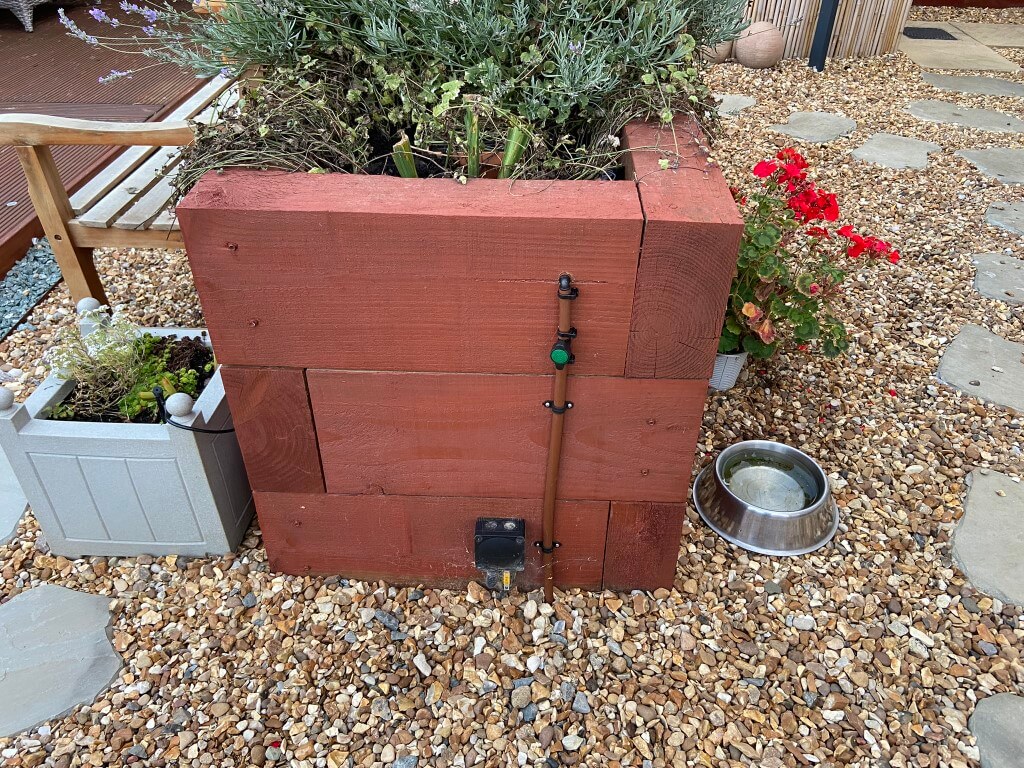
At each planter or main branch I fitted inline isolation valves, sprinkler emitters and shubblers simply push into the thin walled brown LDPE pipe, the use a key punch to make the holes is recommended.
To the left of the picture you can see one of 20 Potstream emitters connected to the main line with 6mm OD x 4mm ID micro PVC pipe.
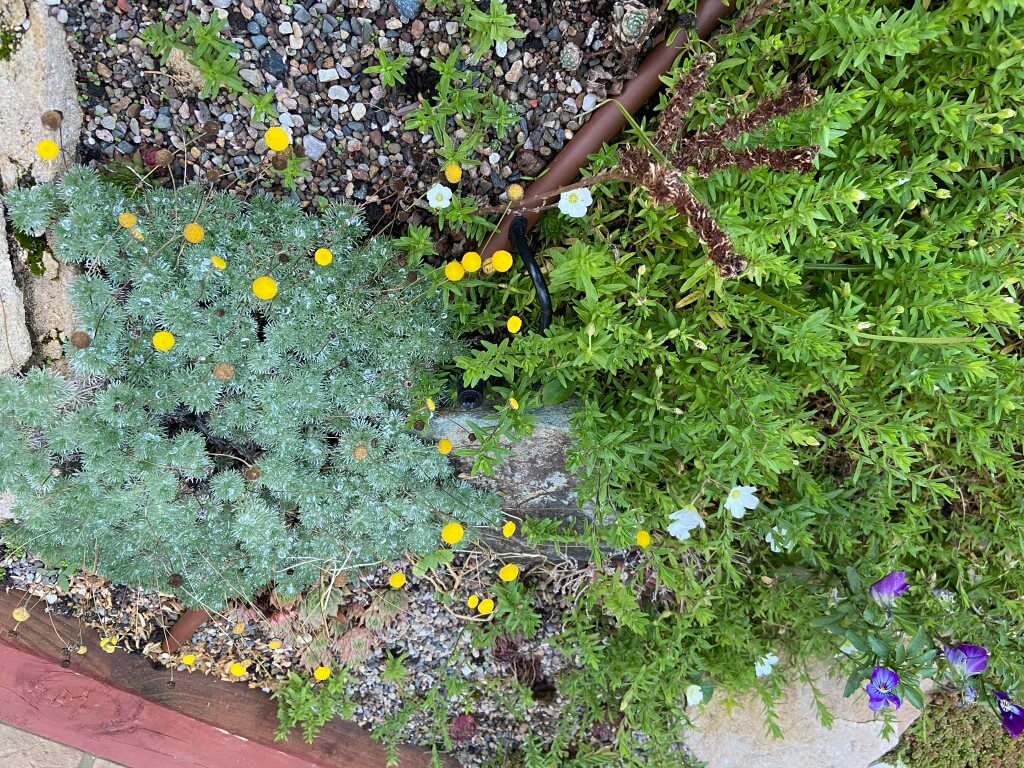
Pipes can be buried and spray heads are very discrete.
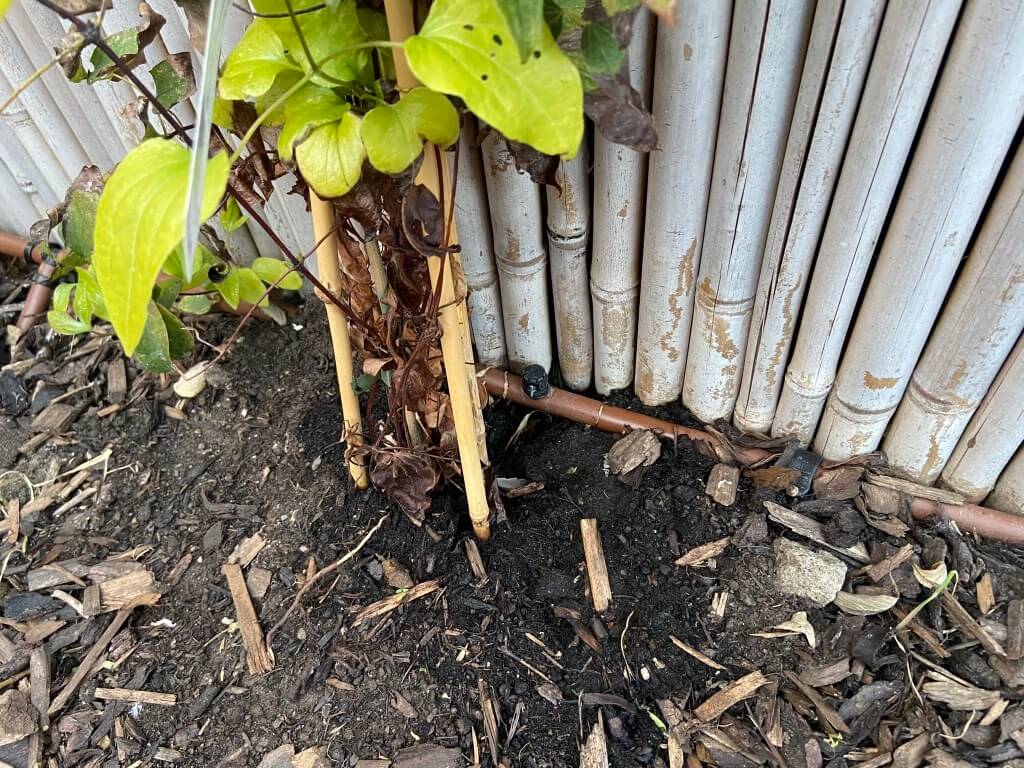
Picture shows a Shubbler 180 emitter connected directly into the LDPE pipe, unfortunately the clematis is struggling as the dog thinks its a lamppost.
The micro irrigation emitters do not come with water usage data, I estimate that my system uses 27 litres per minute (lpm), this is just below the pressure regulators maximum throughput of 30 lpm.
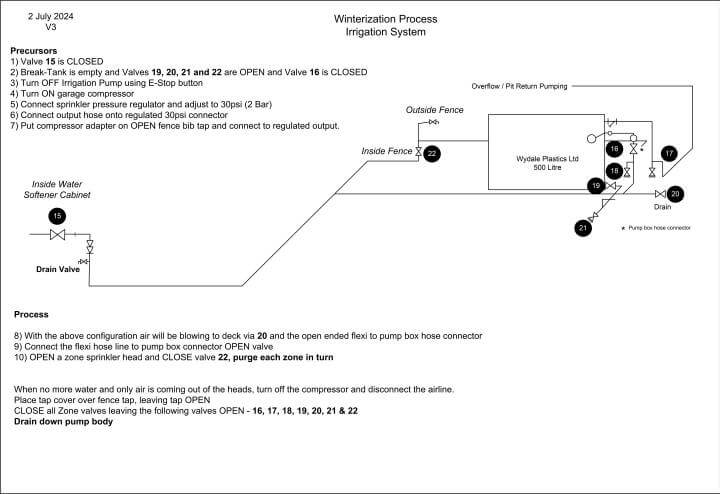
Winterisation
The system will be drained during the winter months to avoid any issues with freezing, hence I was happy with the pipes buried depth and also the lack of below ground lagging.
I have adjusted the original installation to include a fence mounted bib tap so I can benefit from the pumps pressure when watering the lawn, plus the water is separately metered, so I can claim back the sewage abetment payment, the byproduct of this is a connection point to blow all the water lines out.
Although the break-tank will be empty over winter, I decided to insulate the tank when I was boxing the tank in.
I already had a compressor (15CFM), so the parts needed to blow the system out were fairly inexpensive, these being a pressure regulator and adapter for the outside tap where the compressed air will connect to.
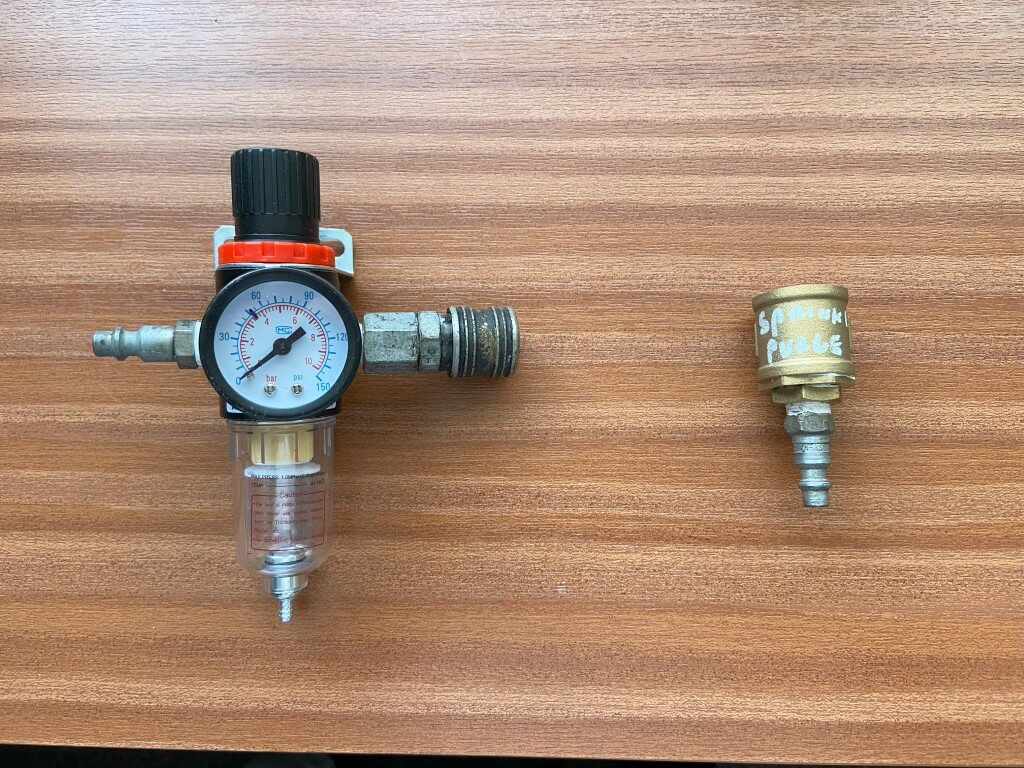
The regulator was £9.95 from eBay, the tap and adapter parts are listed below (Screwfix):
- Bib Cock outside tap -590FA
- 3/4″ Female Socket – 52588
- 3/4″ to 1/2″ Bush – 98427
- 1/2″ to 1/4″ Bush – 79207
- 1/4″ Male Adapter Airline – 2015H
With the above, I connect the regulator, set to 2 Bar (30 psi) to the compressor with the regulated output , via an airline to the tap adapter on the outside tap, this worked really well for me.
Instructions on my process below.
Suppliers Used
Line drawings and Parts used
What have I learned
2023, Thank you to everybody who has found this blog useful, got in touch or commented, I’ve tried to keep this blog up to date with things I’ve done to the system as you can always ‘tweak’ the system and continue to play with it, especially after the hard graft of fitting it.
Watering the lawn and tailoring it when and how long is now a simply press of a button and I would defiantly recommend investing the effort as the payback is more time for other things, year on year.
The system required very little maintenance, blowing the lines out for winter was straightforward, I did however, waste water by leaving the winterisation process a bit to late, meaning instead of using the water in the tank for the lawn, it went to drain as I didn’t want the risk of freezing damage to my tank, even though its insulated.
Bringing the system back online for a new season was very easy and non of the sprinklers malfunctioned or got stuck in the retracted position.
The main additions to my system since I initially blogged it are:
- Dedicated bib tap for my garden hose fed directly off the irrigation pump, this gives me a higher pressure than the mains for washing down or using an impact sprinkler should I need to.
Tip – Know when your going to use the sprinklers for the last time, isolate the filling water to the break tank in order to leave it empty over winter.
Tip -Unplug the pump at the same time as draining down just in case it gets activated by accident and is damaged by running dry.
Tip – A number of my sprinkler body’s had moved from the vertical or sunken since installation due to the ground settling requiring the spade to come out for readjustment.
I have now hammered in a supporting pin parallel to the sprinkler and fastened with cable ties the body to the pin in a hope that this will keep things level.
Tip – One of the jobs on the lawn is to aerate and I really struggled finding the sprinkler heads without turning on the system, so I bought a pack of Survey Flags from Amazon and marked where they are and the buried pipe runs, so I know where I have to either avoid or go easy when plunging sharp tines in the ground 🙂 .

FAQs
Why Hunter and not another make?
After deciding on a permanent irrigation system and researching options, two brands were of serious consideration, Hunter and Rainbird, both excellent, however, it was ease of access to documentation, product range and product performance which made me decide on Hunter, specifically the rotating spray head patterns.
What's the main consideration to think about?
Where are you going to get the water from is the starting point, if you have good water pressure and flow (by measuring it), it may be possible to drive the irrigation system directly from the tap, if so you have saved a lot of money.
If you have poor water pressure, then you will need somewhere to store the water, (unless you have a well or watercourse), and a pump, as you cannot connect a pump directly to a tap.
Where do I start?
This is the daunting bit, but it is something you can do, I used the Hunter Design Guide, which is full of useful information and the steps to follow.
I tend to overthink everything and you could throw in a few heads, linked with hose pipe connected to a tap and it might work perfectly, I on the other hand need to work everything out before I commit to effort and spending money.
- Find your water pressure and flow rate.
- Make a scaled drawing of the area you need to irrigate.
- Look at manufactures literature and determine the appropriate head pattern and number needed to give overlapping coverage.
- Total up the water consumption of the heads or the water consumption per zone if you logically can section your lawn.
- Draw in pipes runs and work out pipe lengths.
- Using the calculators in the FAQs or online determine pipe and pump size (if needed).
With the above info you will now know how much water you need and if you can supply that from a tap, if you can't, consider water storage and how quickly the storage tank will refill as this will be the limiting factor for how long you can water for at a given flow rate.
I've not touched on how the irrigation system will controlled as I made my own, however, these are readily available and simply send a 24v signal to a solenoid water valve to open or close at predetermining time and sequence of your choosing, some are linked to a mobile app for even more flexibility.
What size pump do I need?
Pumps need to push a volume of water (output) at pressure, these are measured in Litres per minute (L/m) and Head respectively.
The pump used in this blog for example has an output of 61 l/min, so theoretically I can supply 19 x MP1000 360 degree rotator heads, with each using 3.18l/min at the same time, obviously this does not take into account sprinkler pipe and fittings friction losses.
Head relates to the pumps pressure and mine is 46 meters (46m), the easy way to roughly convert this to bar, (a bar is 14.7psi at sea level), is to put a decimal point in-between the number, so 46m, becomes 4.6bar.
Handy converter for Head pressure is HERE, (SG - Specific Gravity of water is 0)
Earlier I mentioned pipe friction losses, to put this in perspective my longest run is 37m of 20mm pipe and my pump pressure is 4.6bar, if I had 19 heads taking a total of 61 l/m then the pipe losses would reduce the pressure at the end of the pipe to 2.35bar, well below the pressure required for the heads to operate effectively.
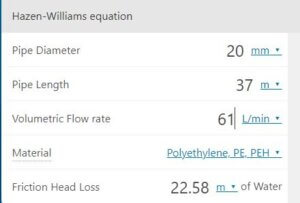
A pipe friction loss calculator link is HERE.
I need a pump, how do I control it?
Residential irrigation controller use 24vAC outputs to power water valves, whereas pumps need 230vAC.
If the controller you choose has a 24vAC output to switch a pump on, you will need a relay to switch the higher voltage and current, these are about £6 on eBay, search for AC24V Coil 8 Pin DIN Rail Electromagnetic Power Relay 10A w Base.
If the controller doesn't have a pump auxiliary output then you can use an automatic pressure switch, such as the Smart Press.
What this does is monitor the pressure from the pump, if the pressure drops, such as when the watering valves open, the pump automatically turns on and will continue to run until the watering valve/s close, also this device stops the pump if it runs out of water to protect the pump.
Does the Hunter PRS40 come with sprinkler heads?
No, these are bought separately due to the extensive range of spray pattern types, the heads simply screw into the PRS40 body, the other bit you will need is a connection elbow to the base of the body.
What size pipe did you use for the sprinklers?
From the solenoid valves to the sprinklers, I used 20mm blue poly MDPE pipe with inserts, the final connection from the poly pipe to the sprinkler body is with 1/2" flexible hose.
20mm was fine for my setup as its based on how much water it will pass in litres per minute over the total length of pipe at the correct pressure, the longer the pipe, the more pressure is dropped, hence sometimes its easier to go up to 25mm if your not sure.
See pump size details FAQ for additional details.
Why Hunter PRS40 body?
This was an easy decision for me as it removed an unknown, as long as I have a water pressure greater than 2.8bar at the spray head it will work.
Without the inbuilt pressure reducing valve, I would have to know what the pressure would be in order to select the correct sprinkler head.
What's the difference between a PRS40, 4 or 6?
This relates to how high the sprinkler 'pops up' out of the ground, either 4" or 6", the range of the water pattern is greater the higher up it is, but this is based on the design, I manage fine with a 4" lift.
How deep do I need to put the pipes?
The main consideration was how long was my aerators tines as I didn't want to damage the pipes at a later date, I buried mine 200mm (8") down which is the length of the trenching shovel I used.
The pipes are blown empty over winter so I have discounted any freezing risk.
Since installing my system, I did see a guy on YouTube who used a reciprocal saw to cut this trench and it worked really well as a great idea as long as you are sure you have no buried services.
Cost & Effort, was it worth it?
The cost for my system was under £900, but I made mistakes, so this blog should save you money in unnecessary purchases, the installation was hard physical work but incredibly rewarding when finished.
The main benefit is that I can sit back and the lawn will be watered to a consistent standard, every time, allowing me to do other things, like sleep 🙂
What was the most frustrating part of the project?
For me it was the line irrigation to planters and drip feeders, the terminology is difficult to understand so I ended up buying lots of things which are now sat in a box, fortunately the bits are relatively inexpensive.